 What has a hazlenut in every bite? That’s right, a Topic from the British sweetie shop of yesteryear, and nothing at all to do with what’s near Tufty’s nest. Sadly discontinued last year, due to falling demand, there’s no accounting for taste.
Topics are still available today to users of Microsoft 365, as a way of curating certain scraps of knowledge that they can share with other users within the same organization. The very first version of Microsoft SharePoint (codenamed “Tahoe”) had a capability that aimed to do much the same thing – “Best Bets” were a way for an administrator to guide the search experience so that if someone ran a query for a term, rather than returning hundreds of old PowerPoint files that contain that word, it would take the searcher to a more official site.
 Viva Topics – because everything is getting Vivafied just as in the days of Tahoe, every other product had Live and/or .NET in its name – is part of a growing family of “employee experience” offerings; it’s an addon to even the top flight
 Office Microsoft 365 subscription, but adds AI-powered discovery as well as the means to manually curate things.
After deploying Topics and assigning licenses to the appropriate users, topic pages can be automatically created based on the documents that exist already – the Search and underlying Graph services can identify subjects that look like are active, with people contributing to them through documents, conversations and so on. Codenames or location names, for example, could be quickly identified and suggested.
A Knowledge Manager could also be assigned to create or approve new pages; individual users could be empowered to do it themselves, though that might end up in something of a mess. Best practice would be to have some kind of form or email-based request, where a user would ask for a topic page to be created and they would then own the content within.
Discovery is pretty easy – depending on how it’s set up, if the title of a topic is mentioned on a SharePoint site, it can be automatically highlighted on a pop-up card with which will give a summary of the topic, and a link to more the main page which contains furtherinformation.
 Topic pages themselves can be full of useful info; a search for documents or other pages that the SharePoint environment behind the scenes considers to be related, as well as specifically curated sources of information, contact cards for the people who are managing the project or involved with the customer, links to docs or other websites etc.
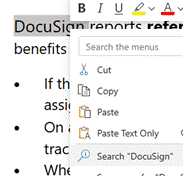
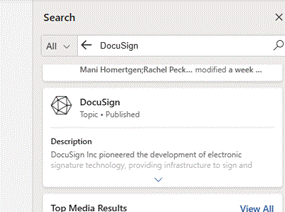
Within Office apps like Word or Outlook, if the user highlights a word or phrase and chooses to Search for it, a sidebar in Office will run a search online and across internal sites for that word – this is avialable to everyone, with or without Topics deployed.
If Topics has been configured and the searched for term is a topic (or is one of the topic’s synonyms, or is otherwise related), then the user will see it fairly prominently in the search results.


![clip_image002[1] clip_image002[1]](https://msdnshared.blob.core.windows.net/media/2016/06/clip_image0021_thumb.jpg)
![clip_image003[1] clip_image003[1]](https://msdnshared.blob.core.windows.net/media/2016/06/clip_image0031_thumb.png)
![clip_image004[1] clip_image004[1]](https://msdnshared.blob.core.windows.net/media/2016/06/clip_image0041_thumb.png)
 Office365 offers a great way of hosting documents in the cloud, using
  apps – and websites – are not always so supportive.
 Navigate to your SharePoint library of choice in the browser, then click on the library tab, then on the Ribbon
  which appears, click Open with Explorer… which will open said SharePoint library as if it was just another file share using Windows Explorer.
 It’s also worth adding the website to your intranet sites if you’re on a non-corporate machine – in the desktop Internet Explorer, first copy the site URL to the clipboard, then go into Tools | Internet Options (by pressing the ALT key to show the menu bar) and add the site to your Intranet zone by clicking the Sites button, then the Advanced button, to paste and include this site in your Intranet zone. You don’t need to do this is on a corporate, domain-joined PC.
  Now, once you have the requisite Explorer window showing you the contents of the SharePoint site (just click on the address bar if you’re in any doubt as to
  whether it’s coming from SharePoint or not), then try right-clicking the Favorites menu in Explorer and adding the current location to Favorites. Now, it’ll show up in the list and can be renamed by right-clicking it, perhaps giving it a more uniquely identifiable name than “Shared Documents”, for example.
  URL/UNC to the clipboard, it can then be added to
  Network Locations by right-clicking on This PC within Windows Explorer and choosing Add Network Location to make the link show up in that group of shortcuts.


![clip_image002[4] clip_image002[4]](https://msdnshared.blob.core.windows.net/media/TNBlogsFS/prod.evol.blogs.technet.com/CommunityServer.Blogs.Components.WeblogFiles/00/00/00/48/08/metablogapi/7713.clip_image002[4]_thumb.jpg)
![clip_image005[4] clip_image005[4]](https://msdnshared.blob.core.windows.net/media/TNBlogsFS/prod.evol.blogs.technet.com/CommunityServer.Blogs.Components.WeblogFiles/00/00/00/48/08/metablogapi/7801.clip_image005[4]_thumb.jpg)

![clip_image002[4] clip_image002[4]](https://msdnshared.blob.core.windows.net/media/TNBlogsFS/prod.evol.blogs.technet.com/CommunityServer.Blogs.Components.WeblogFiles/00/00/00/48/08/metablogapi/0537.clip_image0024_thumb_23D61131.jpg)


