675 – Does size matter?

clip_image001

When disk size was measured in Megabytes and network bandwidth even less, size of files really mattered. When non-floppy floppy disks were sized in 1.something MB, IOMega Zip drives promised 100x as much storage for only a few times the outlay.

The dramatic growth in capacity and drop in cost of storage has radically outpaced Moore’s law, where a gigabyte of disk storage might have cost $100 in 1997 and only $10 by the year 2000. Nowadays, if you bought your gigs on a spinny platter, they’d cost you less than $0.01 each. For most end users, solid state storage has largely replaced the traditional hard disk and even with 10x performance, the price is still only a few cents per GB.

That said, storing data in the cloud costs money over the long term, and has a potentially negative environmental impact – a Stanford report from a few years ago estimated that saving and storing 100GB in the cloud for a year costs the equivalent of 0.2 tonnes of CO2, or about the same as a one-way flight from Seattle to San Francisco. So reducing unnecessary cloud storage can be worthwhile.

clip_image003

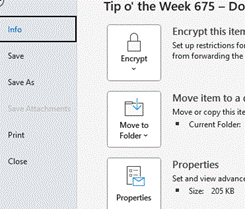
If you’re writing an email in Outlook, you can see the current size from the File | Info menu.

clip_image005In Word, Excel and PowerPoint, you can see the document size and other useful info in the same place (varying details depending on which application).

A previous Tip dealt with the scourge of bloating PowerPoint files, where it’s not uncommon to have unnecessary large images lurking within the template you’re using, but there’s a simple trick that’s common across all Office apps – compressing picture size.

clip_image007Especially if you’re embedding photos from a phone or even screen-grabs from a high-res display, individual files can be in the multi-megabyte* category. In many cases, you might resize your image so doesn’t take up such a huge part of your document, but the app will still be storing the full resolution of the image – including any bits you’ve cropped out – behind the scenes.

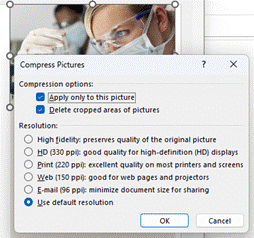
To compress pictures in your document – and let’s use PowerPoint as an example given that it’s the chief culpritclip_image009simply select an image and in the Picture Format menu which appears, choose the Compress Pictures option.

This will let you determine the level of detail to keep for this image – if it’s a simple presentation, then it probably doesn’t need a very high definition picture. You also select whether to keep or discard any cropped areas, and importantly, whether to apply to just this one or by clearing the top option, applying to all images in the file.

Try taking any large PowerPoint file, delete cropped areas and apply Web or Print resolution to all images, and you might see it drop to 10% of its previous size.

clip_image011

The Compress Pictures option is also available from the folder picker in the old File | Save As dialog, and there are other options to change the default resolution available from within the File | Options menu.

*Remember kiddos, there are 1000 MB in one GB; smart alecs might believe that a kilobyte would be 210 bytes – 1024 – but for 25 years international standards have defined that as a kibibyte or KiB, trying to assert with less ambiguity that a kilobyte is actually 1000 bytes, therefore a Gigabyte is 1,000 x 1,000 x 1,000 = 1,000,000,000 bytes, whereas a Gibibyte – srsly – is 1,0243, or 1,073,741,824 bytes).

674 – Here’s the (co)pilot

imageUK telly viewers in the early noughties may recall the surreal comedy show, Trigger Happy TV, with recurring characters like the aggressive squirrels or the  guy with the massive phone (and that Nokia ring tone).

It was also known for some great soundtracks, like the fantastically titled Grandaddy song “He’s Simple, He’s Dumb, He’s the Pilot(also used elsewhere). Tech news over recent weeks tells us that the pilot – or Copilot – is anything but dumb, even if it can be simple.

clip_image002For Microsoft watchers, “Copilot” is a growing set of capabilities which are being built to add OpenAI functionality to other applications. With all the hoo-hah about ChatGPT and the generative AI that is now integrated into Bing (and available for everyone who wants it, not just early adopters), it’s easy to get different strands mixed up.

GPT-3 and now GPT-4 are the core language models which could underpin any number of applications’ use of what looks like artificial intelligence. ChatGPT is one web app built to hone some of the parameters of GPT-3 and put a chatbot front end to it. The new Bing and all the other stuff announced over the last few weeks is not using ChatGPT, but they do share some of the same technology underneath. Capisce?

There have been AI features aimed at making developers’ lives easier, such as Github Copilot (available since 2021), which uses another OpenAI tool called Codex, itself built to harness GPT-3. For developers on Power Platform, there have been AI functions for years too, though some capability has been recently added.

Everyday users of Dynamics 365 and Office applications will soon get Copilot capabilities to help automate boring tasks, like “work”. Do bear in mind that announcing something and making something available – in limited preview form or generally – are different activities. Copilot for Office apps like Outlook might be a few weeks or months away for most of us, but who can’t wait for AI to automatically read and reply to all their emails?

clip_image004

The future with our robot overlords never looked so appealing.

For a growing summary of Copilot announcements, see the hugely popular LinkedIn post from Jack Rowbotham.

673 – Where is my mouse?

clip_image002

The “mouse” was invented 60 years ago, as a means of moving a cursor around on-screen. Through many generations of hardware, it evolved from using wheels to rubbery balls, before eventually going sensor-based and even losing the tail that may have helped coin its original name

Since many people now use laptops with touchpads, they won’t even use an external meecely peripheral but the term “mouse” is still often used to refer to the pointer that it controls. Finding that pointer on your desktop can sometimes be a challenge, especially if you have multiple screens on your computer, and particularly if at least one of them is a snazzy ultrawide job.

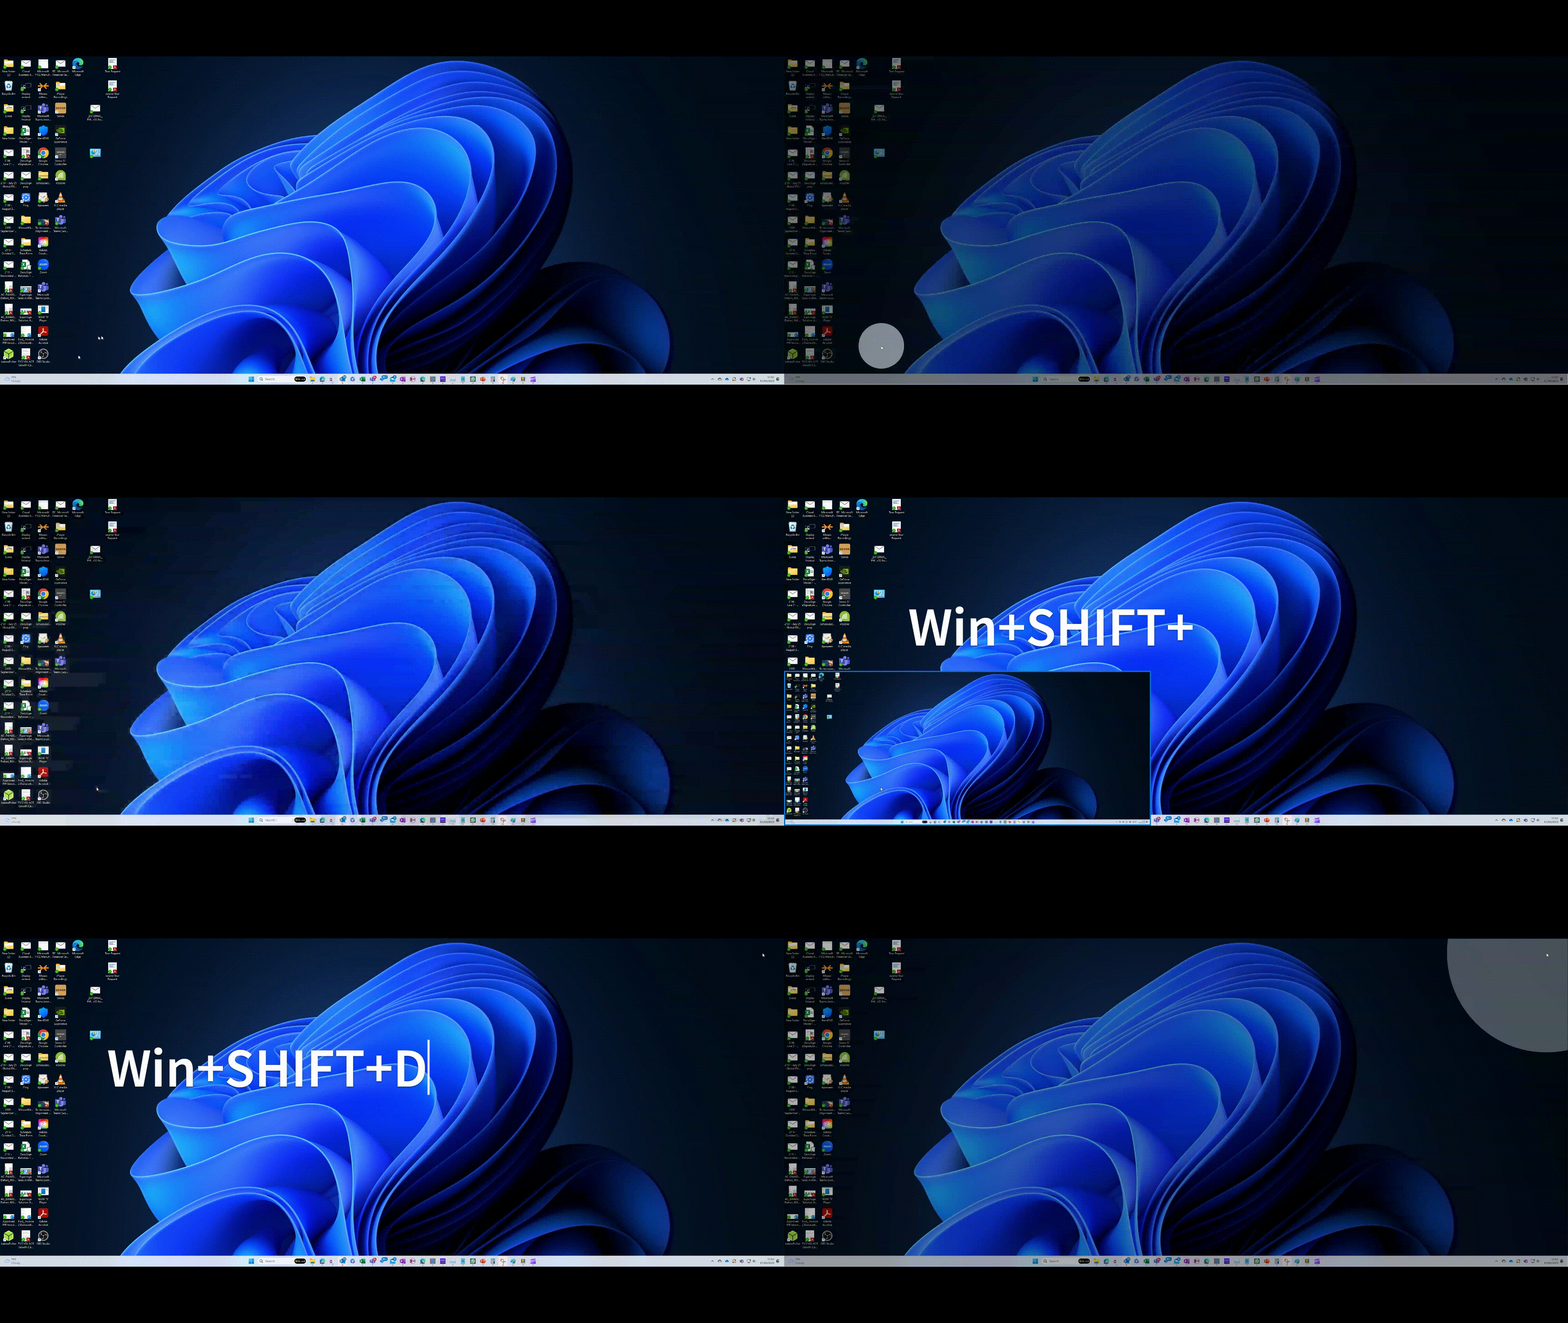
mouseyThe free PowerToys addons to Windows 11 includes a section of Mouse utilities; install the full PowerToys suite and you can usually enable each feature individually, and set what mechanism you’d use to invoke it. Perhaps the most useful is the “Find my Mouse” keyboard shortcut – just press the CTRL key twice in quick succession, and the screen dims with a spotlight on where your pointer currently is. Press CTRL once again to remove it and go back to normal.

crosshairsThere are loads of settings to tweak how some of the utilities work – Find my Mouse could be enabled by shaking your mouse if you’d prefer. There’s also a highlighter feature that indicates if you’re pressing a left or right mouse button, or a crosshair view which, when turned on, sets a permanent crosshair display (again, configurable in numerous ways) that remains in place until you repeat the key combo to switch it off.

clip_image008Mice can jump high – who knew?

A new mousey feature in the latest release of PowerToys is called Mouse Jump – erstwhile known as FancyMouse – and lets you teleport your mouse pointer from one side of a potentially massive desktop to another.

This is particularly handy if clip_image010you have multiple screens set at different heights, and in order to traverse from one side of the desktop to the other would take you multiple swipes of a physical mouse or strokes of a touchpad.

Press the activation key and you’ll see a shrunken version of the desktop in a small window; click where you want the pointer to vamoose to on that depiction of the display and it will teleport to the other side of the desktop.

safevideoconverter-output

672 – Why your meetings are clashing

clip_image002

Look at your work calendar for the next two weeks or so; if you’re a part of a multi-national organization that routinely has meetings with people all over the world, your nicely ordered diary might be a maelstrom of overlapping and clashing appointments. Welcome to the start of the 6-monthly Daylight Saving Time Shuffle! Of course, you might have clashing for other reasons.

Meetings in Outlook – apparently, other PIMs are available – are created in the time zone of the organizer. If you’re in London and have set up a weekly 4pm meeting, most of the time that’s at 8am for the people in San Francisco, but for the next 2 weeks it’d be 9am and therefore possibly conflicting with whatever else they had planned for then.

The topic of time and its zones has been covered ad nauseam on ToW passim, but it’s worth a quick reminder of what is ahead (and other countries / regions still do vary – see a summary of the global daylight saving time dates and regions, here), especially since the US has a habit of doing things differently to the rest of the world:

  • 12 March 2023 – Most of the US, Canada, Carribean enters DST (if observed)
  • 24-26 March – most of the rest of the Northern Hemisphere enters DST (if observed)
  • 2 April – Australia, New Zealand leaves DST

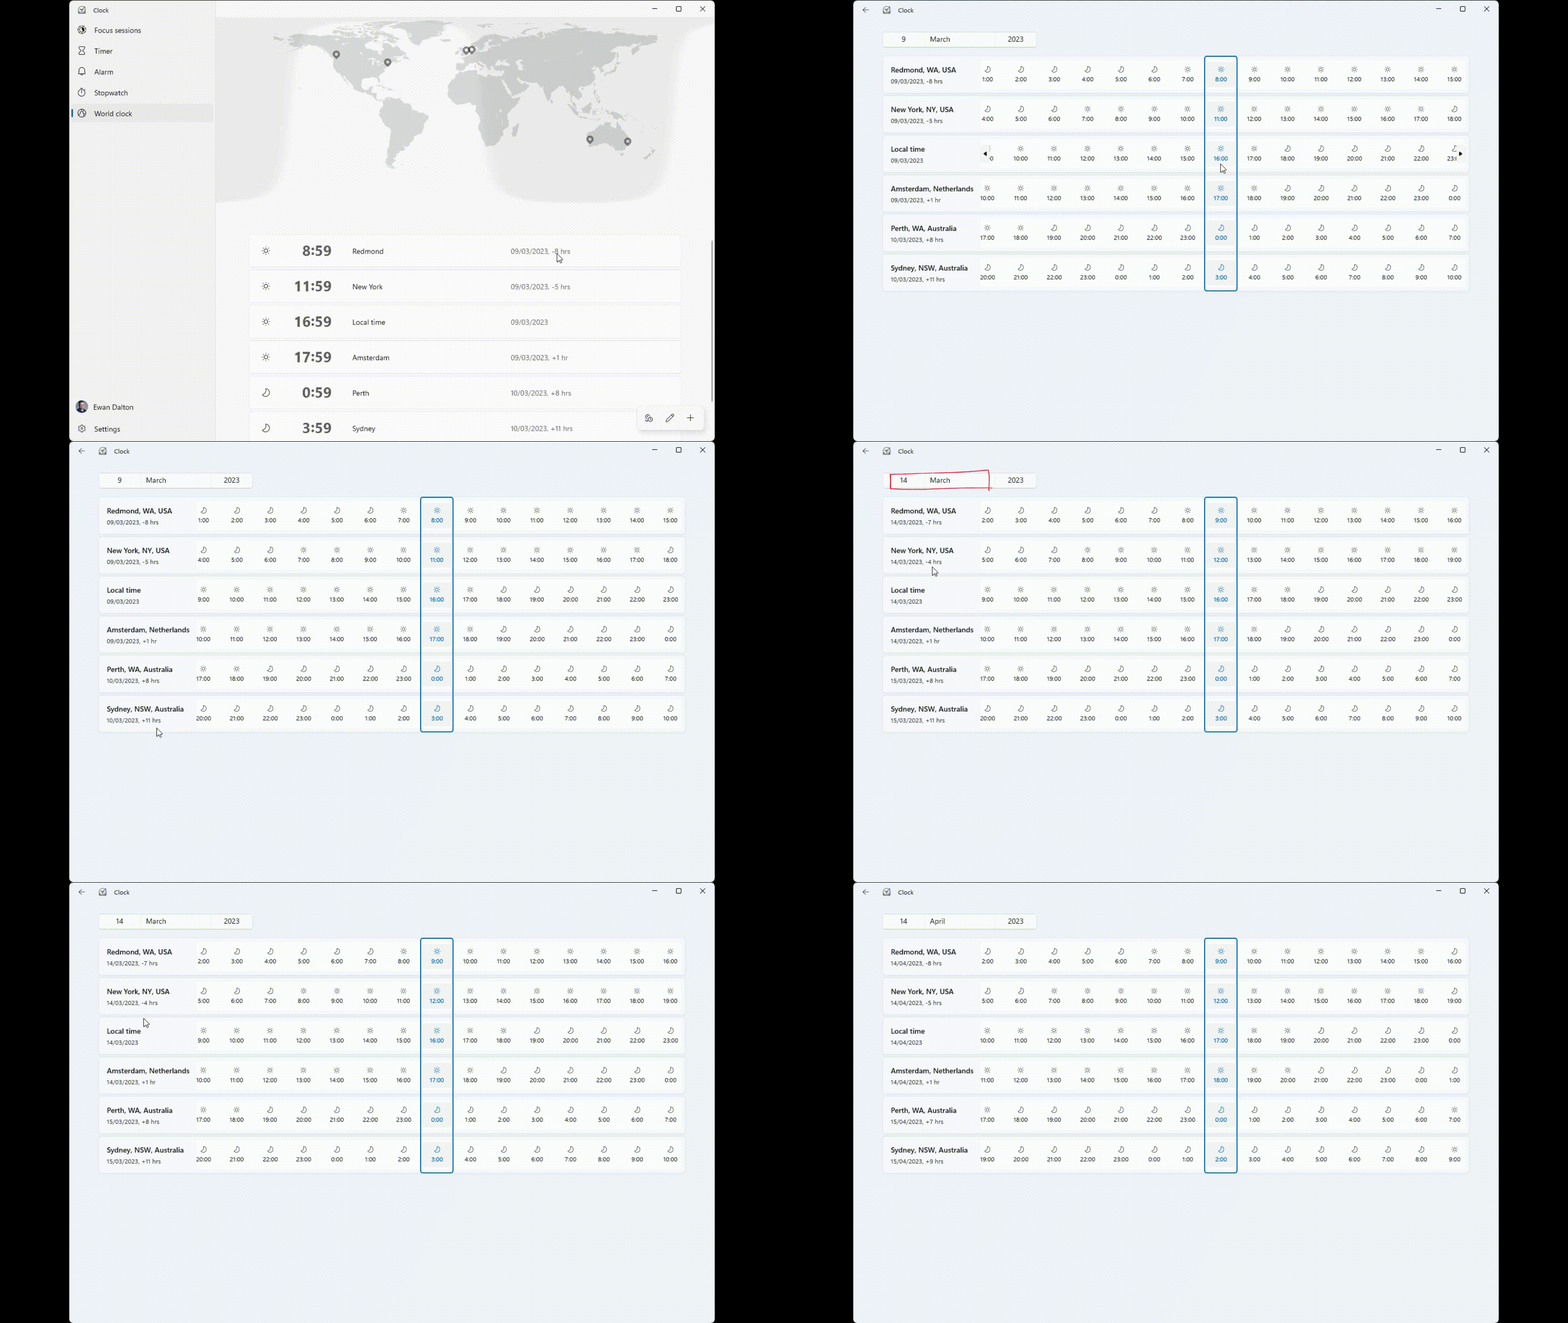
Practically, that means that today, a noon meeting in Seattle would be 8pm in London and 7am (tomorrow) in Sydney, but in a little over 3 weeks that would have moved to noon/7pm/6am and eventually settled back at clip_image004noon SEA and 8pm LON, but now at a refreshing 5am SYD.

Fortunately, the Clock app on Windows 11  has a “Word Clock” feature that lets you pin cities to the map and you’ll see what the current time is (and what the time zone offset is currently). You can also get a tabular view of what the relative time will be at any given date.

Windows Clock app

671 – Excel-lent

imageEven old dogs like Excel have some new tricks up their sleeves. The spreadsheet application category was defined by VisiCalc in the late 1970s, and was a driving force behind the success of personal computers; accountants and finance managers and the like could quickly do their own sums instead of waiting for a report from the Data Processing department which fed and watered the big iron. When the PC came out, Lotus 1-2-3 was king of the hill and Microsoft’s Multiplan was an also-ran, until Windows arrived and the new Excel program moved from underdog to top enchilada.

clip_image001First off, if you’re going to use Excel to create a table of some sort, start by Formatting as Table. It makes it so much easier to manage the data later – sorting, filtering, formatting are straightforward.

If clip_image003you choose that your table has headers, the name of the top row will also be marked with an arrow to filter the list, and also appears in any formulae you might develop.

clip_image004Rather than referencing cells in a formula by A2 etc, you could put the cursor onto the field you want to reference, and the name of the column will be used, and when you enter that fclip_image006ormula, it can be easily copied to every row.

clip_image007Excel has other smarts, though – let’s forget about formulae in this case, and just type the First name in column B; dragging the bottom right corner of that cell all the way to the bottom of the table, will fill every cell with “Mary” but a little Auto-Fill Settings prompt will appear at the bottom. Click that and you can change it to Flash Fill.

clip_image009Et voila! Excel has figured out the relationship between the text and applied the same clip_image011pattern to all the other rows in the table. Repeat the exercise in this case by filling Green in the Last name and MG in initials. A quicker way of applying auto-fill is to put the cursor in column C and press CTRL-E, then repeat on column D.

If you find yourself working with tables and the columns aren’t wide enough to show the data fully, you can clip_image013quickly widen one column by double-clicking on the bar to the side of the column heading; select several colums at the same time and double-click on one of the width adjustors and they’ll all be resized to fit. The same trick works on rows, by double-clicking on the height adjustor on the far left of the row.

If you want to select all the table, put the cursor in the very top left corner of cell A1 and you should see it change shape to a diagonal pointing arrow; click once to select the whole table. Another way would be to put your cursor in the table and press CTRL-A; that selects the entire data portion. Press CTRL-A again if you want to include the header row too.

clip_image015

clip_image017If you have the table selected, press ALT and release it – you’ll see a load of letters appear over the menus, which jump to specific functions. Press and release H to go to the Home tab, then O to jump to the Format menu, then I for auto-width or A for auto-height.

The final magic Excel trick for today is autocomplete.

If you start typing a text value in a cell, Excel might clip_image019look at others in the rows above and offer you an autocomplete option – just clip_image021press tab or downarrow and it will fill in that value for you. Another option is to press ALT and and down arrow when you first enter or select the cell; it will show a drop-down list of all the previous values, and you can either use mouse or up/down/enter keys to select the one you want. Excellent!