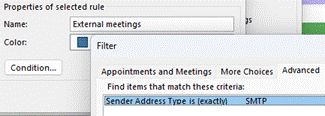
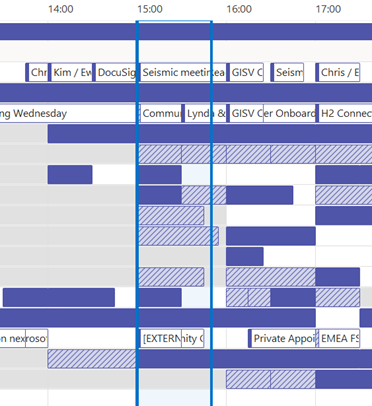
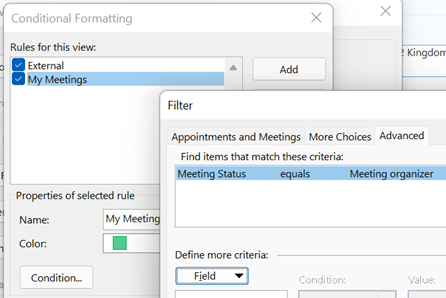
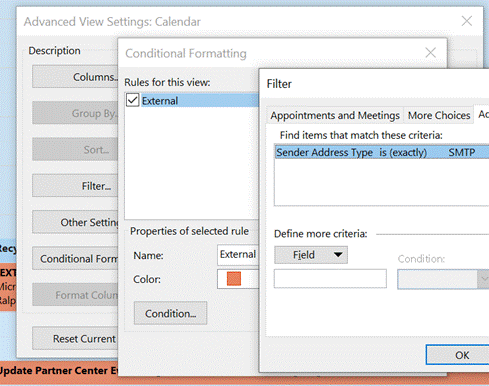
Thinking of meetings you have organised, you can do a few things to make them stand out, like configuring your calendar view to show your own meetings in a different colour. … click Conditional Formatting, add a new rule and click Condition… to set it up. Go to the Advanced tab, click on Field and choose All Appointment Fields, then Meeting Status, then set equals Meeting organizer as the condition, set your colour, font etc choice and save it all out.
Ghost meetings – you’re organiser, nobody else shows up How many times have you joined an online meeting that you organised, waited a few minutes and then realised that the other party/parties have actually declined but you didn’t notice? Sure, you can see in the tracking tab of a meeting, but might not check until you’ve already started the meeting and wonder why you’re on your Jack Jones. At this time of year, it’s quite likely you’ll have regular meetings with colleagues, customers or partners, and that instance has been declined by all of the invited attendees: the only real solution is to look ahead at your calendar, check the tracking responses and delete meetings which nobody else will attend. What a palaver. Never fear, dear reader. Here’s an Excel spreadsheet with a macro which will list all the future meetings where you are the organiser and all of the attendees have either not responded or have declined, so you can easily decide which ones to go and remove. Download the ZIP file from the link above, save/open it on your PC and you’ll see there’s a single XLSM file within. Open that in Excel, allow changes and enable Macros so it will run, then click the Scan Calendar button to show you a list of meetings that you might be able to delete since everyone else has already bailed out. It will take a couple of minutes to run but will eventually show you a list sorted with the earliest at the top. Have a great holiday season, everyone. See you in the New Year! |
Tag: calendar
573 – Searching in Outlook
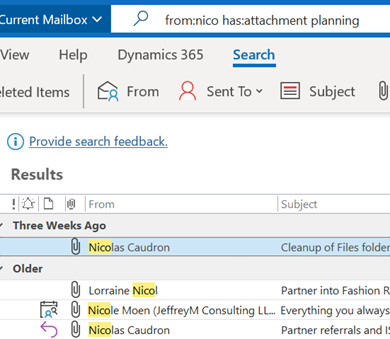
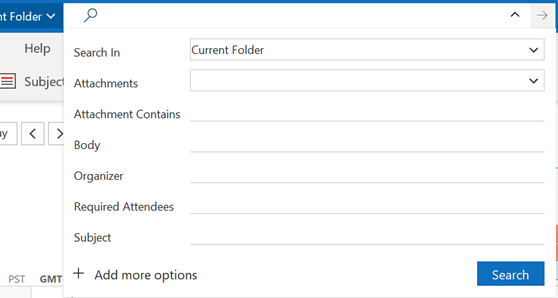
Or has:attachment, which will only show you mails that have other files attached. Combined with a few other criteria, you can filter the results of your search pretty hard, rather than sifting through them. Adding some other smarts like received:”last month” can streamline some more. For more info on search terms, see here. The scenarios our reader posed, though, were specifically around searching in the calendar – eg, do I have a meeting in my calendar with a particular person? Or what recurring appointments are due to expire this month? If you navigate to your Calendar and click the down-pointing arrow to the right of the Search box, it will display a Click + Add more options to bring up a picker that lets you add even more – such as whether the meeting is a recurring one, or if it shows in calendar as Busy or not. Selecting the options builds the query as before, so you can see a variety of defined names – like organizer | organiser (depending on your locale) or requiredattendee:. Coming back to the original question; if you want to find all future meetings in your calendar with anyone called Tony, you could type something like requiredattendee:tony start:>today. And if you want to find out which
Don’t be alarmed if some of them are due to keep happening until a very long way into the future. We’ll probably have stopped using email by then. History Lesson Before Outlook arrived as part of Office 97, users of Exchange Server had an email client and a separate calendar app (Schedule+; that’s why some diehards still say things like “send me an S+”, meaning send a meeting request). Both would maintain a connection to the server and would chat back and forth, only downloading data when a message or attachment was opened. Although this put something of a penalty on the network, it meant there was no need to cache large amounts of data on a PC hard disk. Outlook replaced both the mail and S+ clients, but maintained the same synchronous connection to the server. Outlook 2003 and Exchange 2003 changed the default model, since PC hard disks were getting much bigger and cheaper, so it made sense to have Outlook deal primarily with a cached copy of the user’s mailbox, bringing all kinds of performance benefits to both end user and to the operators of the server back-end. One really notable improvement was the ability to run fast searches against mailbox data that’s in the cache, rather than having to execute searches on the server. Prior to the cached mode, the best-case scenario for running a search was the server returned messages that fit a particular query asked by the client – mails received this week, mails with FOO in the subject line etc. If the server had indexed the relevant properties (received date, subject etc), it was pretty quick at sending back the results. If the user wanted something more in-depth, it was a punishingly slow process as each message would need to be picked up and inspected to see if it met the query – so searching for every email with a particular word in the message body text would be laborious. Three cheers for cached mode and client-side indexing.
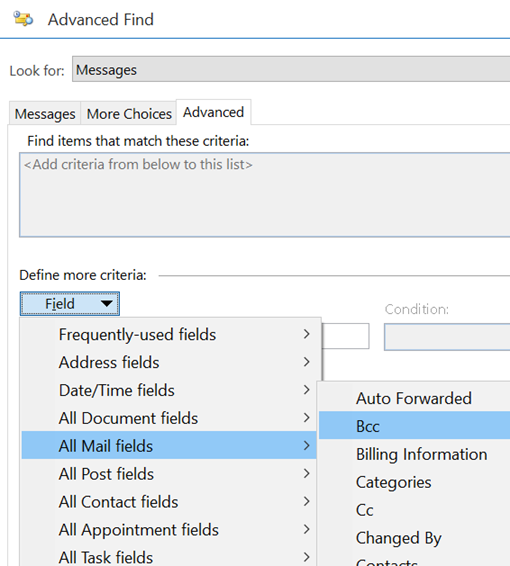
The first couple of tabs on the Advanced Find dialog let you search for mailbox items that fit some common criteria – but the third tab is a window into how Exchange stores and categorises messages, appointments, tasks etc.
Aside: most apps use CTRL+F to invoke Find – try it in Word, Excel etc – but in the mail client, CTRL+F forwards a message instead. Find out why, here. The idea here is that you can build a query based on properties of messages – and when you select the Field from the extensive drop-down list, it would let you choose appropriate filters (some, like Flag Status or Receipt Requested would only have a couple of possible values, but others would let the user enter text, date or numeric filters). Not all of the fields are used for much these days – eg InfoPath Form Type harks back to the days when the now-defunct InfoPath could be used to create mailable forms – but having a poke around in Advanced Find can give a curious user some insight into how Exchange and Outlook organises their data. |
#571 – Save the Daylight
If the country or state you’re in observes summer time, then you’re either about to enter (if in the northern half of the marble) or leave it (if southern). To keep us on our toes, this movement back or forth often happens around the world on different dates. To keep us on our toes, some countries have less-than-hour gaps between time zones, and in the past, others have decided to change time zone permanently.
– eg if it’s 2:30am in Iran, then lining Tehran up with the red hand would put both London and Paris at midnight, since they’re both at GMT+1. eh? In October 1968, the UK decided to move to British Standard Time – GMT+1 – all year round. This particular wristwatch was produced between 1968 and the end of 1971, when the practice was reversed – so for a while, it was correct that London would be in the same time zone as Paris and Rome. Except the watch wouldn’t know when Paris and Rome went into summer time, thus putting them an hour further ahead… oh well, never mind. In a global working environment, especially one where everything is done online rather than having people in the same location, the friction of time zones changing has never been more obvious. Usually, you’ll only move through time zones relative to everyone else when you travel – flying across large distances, or maybe just driving across a bridge or dam. But now, a digitally-oriented meeting can shift its time for some of its attendees, relative to the others – depending on where the originator is based.
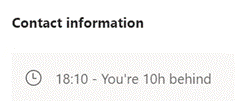
Those parts of the US which observe DST, are due to move an hour forward this coming Sunday (ie March 14th). In common with doing things differently to everywhere else, that brings the US (and Canada) one hour nearer most of Europe for the next two weeks, until the end of March. Much of the southern hemisphere comes out of DST the week after that, so by then Sydney will be two hours nearer London than currently. The impact of this can be seen in peoples’ calendars, when regular meetings somewhat inexplicably start to clash with each other – if a UK organiser set a recurring meeting for 4pm GMT, that would normally compel Seattleites to be there at 8am, but since they’ll be only 7 hours behind for a couple of weeks, that shifts to 9am in their calendar, potentially clashing with some existing 9am Pacific Daylight Time meeting. Conversely, a 9am PST / 5pm GMT meeting as created by the person in the US a few weeks ago, would now start at 4pm in the afternoon in London. Great news if that meeting is a Friday afternoon, as it brings beer o’clock one hour forward. Although Outlook does a pretty decent job of juggling the differences between time zones, there is no obvious way to show what time zone a meeting had been created in (eg show me all meetings that are going to be affected by this shift for the next 2 weeks). A simple trick if you want to check on a specific meeting, is to start a Reply to a meeting you’ve been invited to, whereupon you’ll see the time zone of its creator…
While It won’t help you identify the meetings that are causing the clashes, it might help restrain you from firing angry missives at the organiser of the meeting, if you know what’s causing it. |
539 – Outlook calendaring fun
Here are a few simple tricks to remember when working with your calendar:
|
517 – Try the preview…
To find the name of any installed Store app, so you can run it from a command line or dialog, fire up powershell (just press the Start button and type that) then paste: foreach ($p in $(get-appxpackage)) { foreach ($n in (Get-AppxPackageManifest $p).package.applications.application.extensions.extension.protocol.name) { $p.packagefullname + “`t `t `t -=- ” + $n } } … and enter that. You’ll get a list of long app names followed by a one-word name that can be used to invoke the app. To run a Store app from a Run dialog or the Start menu directly, use that one word with a colon at the end – to start the Store version of OneNote try typing Win+R onenote: (for example).
The preview will only show up (for now) if you’re a Windows Insider. Fortune favours the brave! |
Tip o’ the Week 478 – O365 and Windows’ Mail and Calendar
The genesis of Outlook on the phone as we know it today, is perhaps the acquisition of a company called Accompli 5 years ago, and a great deal of refinement and effort since.
e.g. Hit WindowsKey+R then enter outlookcal: and you’ll jump straight into the Calendar app. Both have come a very long way – at first release, they were pretty basic, but they’re now so well featured that most people could use them as their primary email and calendar apps, most of the time.
Go into the settings on the Calendar app, then Manage accounts, then + Add account… or just Win+R then outlookaccounts: and you’ll be able to add your Office 365 account onto both Mail and Calendar. If you have multiple calendars connected – like home Office 365, Gmail or Outllook.com accounts as well as your corporate one – you could selectively enable them for display in the app, and the set of calendars that are shown will also appear in the agenda if you click on the clock / date on your taskbar. You can also see your upcoming appointments in a live tile on the Start menu, if you still use such things. You’ll also see your next appointment on the Windows Lock Screen if you have it enabled under Lock screen settings. You may want to go into the Notifications & actions settings page (just press Start and begin typing notif…) and turning off Calendar notifications, or you’ll get a blizzard of reminders from desktop Outlook and the Calendar app. |
Tip o’ the Week 368 – Mail and Calendar apps mature
Ever since Windows 8 came out, the The Mail & Calendar apps are essentially joined now – though you still have “Mail”
Both mail and calendar functionality is getting advanced enough, you might choose to set up Mail and Calendar for your work/Office 365 email account, rather than bothering with installing Outlook on your home PC or companion tablet device.
Another notable new feature in Calendar is dubbed “Interesting Calendars”, optionally added alongside and sourced from a variety of publishers surfaced via Bing, and tailored for you based on locale. If you have multiple mail accounts set up, you can choose which one to add your “interesting calendars” to, by checking under the Settings > Calendar section (note – to get to the calendar specific settings, he app needs to be in the calendar view at the time, then invoke settings by clicking on the gear wheel in the icons on the bottom-left). If you add a custom calendar to your Office 365 account, the same one will be visible within Outlook too, under the “My Calendars” group.
Handy if you’re using the Mail app on a touch device (from a cheap 8” Windows tablet to a Surface being used in tablet mode).
For a history of new features in Mail and Calendar, see here (though since that page doesn’t list version numbers and also doesn’t look comprehensively up-to-date, YMMV). |
Tip o’ the Week 322 – Booking meeting rooms (again)
Building on last week’s ToW and on a topic that has been covered some time ago, let’s dig deep into the bowels of Outlook, going back almost 20 years to Outlook Forms to solve a very particular problem. As per ToWs passim (like Eyes), every item (message, contact, appointment etc) you open in Outlook is a bag of data fields that are rendered in front of your eyes by a form. It’s possible to design and publish custom forms to do more stuff, or in this instance, to fulfil a specific function and by pre-populating some data and by hiding other extraneous information. Show meeting rooms Meeting rooms are often set up as bookable resources within Exchange & Outlook – so you invite the room to your meeting and it automatically accepts, meaning you’ve reserved that resource. When trying to figure which rooms are free, if you only have a few meeting rooms then it might be easy enough to just show their calendars from the Room List (eg here). If you’re using a more modern version of Outlook and/or have more than a few rooms to deal with, then Room Finder is more useful. See here and here. As an end-user, though, you may find that your IT department doesn’t manage the rooms the way you’d like – in a new building, for example, there might be no room list published – so not much help if you’re trying to book a room. Here’s a somewhat hacked-up solution which might be useful in other ways, though – it involves customising a form of your own, with your favourite rooms shown, so you can quickly check their availability. You could do the same thing with a group of people too, should you want. Let’s get building Start by going into your Calendar, and create a blank Appointment form, then follow the steps for adding the Design This Form command to the Quick Access Toolbar (or right-click the Ribbon when in a new
Now you’ll have switched to a form Now that’s all done, Publish the new form as a custom name (something like <building name> Meeting Rooms) then hit the Publish button. This will now save the form into your own Calendar folder, so it will be available from any PC running Outlook.
You’ll now see the custom form will display only the grid view of room availability, with all of the rooms ticked. You won’t actually use this Make sure you close down the custom form without saving or sending anything. This approach is nicely flexible in that you can create your own “lists” of favourite rooms (eg all large customer rooms with AV, or all rooms kitted out with Surface Hub, devices in any location etc). If your desired selection changes, you can create a new form and Publish As using the name of an existing one to replace it (or open the existing custom form, enter Design This Form mode again, go to the Appointment tab and edit the list of invitees there). If you’d like to delete old forms then from the main Outlook window, go into File | Options | Advanced | Developers | Custom Forms | Manage Forms, and click on Set… to navigate to your own calendar folder, then delete the forms you no longer need. Phew. |
Tip o’ the Week #271 – Finding your Friends
Sometimes, people don’t want to be found. That’s maybe understandable if you’re a sweary unemployed pugilist, but often, you’d like to locate your friends and colleagues and you’d like them to find you.
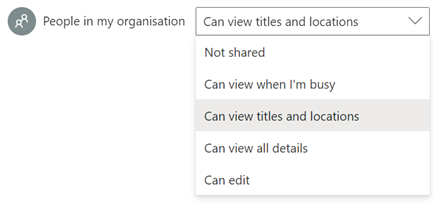
Start by letting people see your calendar – in days gone by, the norm in Microsoft Outlook and Exchange was to let everyone see what your calendar says, but in recent versions, the only info you’d see by default would be their free/busy status – which isn’t really much use if you’re trying to collaborate with them. All it would take is some eejit to invite you to their holiday, marking the time as out of office and therefore obliterating your own F/B status for people looking to book you for meetings.
Free/Busy is basically rubbish – it doesn’t let anyone know where you are, how likely you are to be available in a given location, etc. So, if you regularly get meeting requests from people expecting you to be in one place when your calendar shows you’re somewhere else, then maybe you should share your calendar better, and tell them to look in your calendar before emailing to ask if you’re available.
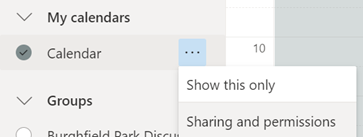
There are a few options for better calendar sharin: if you look on the Share tab when looking at the Calendar in Outlook 2013, you’ll see a
Calendar Permissions option, which will let you set the default permissions on your calendar, and see/set it you’ve granted more rights to certain folk – so you could allow everyone to see basic info, and your closest colleagues can be given the right to see everything.
Unless you’ve got something to hide (and if you do, you can always set those appointments as Private), then set the defaut sharing level to be Full Details – in which case, people will be able to see where you are, and who else is supposed to be at your meeting. If you choose any other option, then others won’t be able to open your meeting, so they wouldn’t see body text (like agenda, directions etc) or the attendee list.
FindMe – a Microsoft internal tool
There’s a snazzy tool developed by a group of Microsoft staff (in an internal development effort akin to the Garage), called FindMe. There are two parts – the installable software agent sits in the PC’s system try and provides your whereabouts to friends who you want to allow to see your location, and there’s a web front-end which will show you where your friends are.
The killer app part of FindMe is its ability to see the meeting rooms located in your chosen location – you can use it without needing to install the agent, and in supported locations you can see the floor layout, and a colour-coded view of the meeting rooms to show availability at a given date and time (and a one-click link to make a booking).
As for finding people, if they have the agent running and if the location services detect that they’re sitting in a supported Microsoft building, you’ll see them on a floor plan, otherwise you’ll be shown a world map.
The software can use triangulated positions against known Microsoft WiFi network points, to show not just which building someone is in, but potentially right down to which desk they’re sitting at – it’s brilliant, but it needs a good deal of work in surveying the buildings to make it useful – but the team is working on how to make it available to customers as part of a Microsoft Services engagement. If you’re interested in learning more, ask your Microsoft contact to get in touch with the FindMe team (just send mail to the DL with alias findme).