
Design is everywhere in the things we have made. Intentional or inherent, every object is that way for a reason. Whether an item’s design is primarily to make it easy and obvious to use (see Bic), just to look amazing, or for some amalgam of form and function, we often know it when we see it. Sir Lord Kevin McCloud has made a career of pointing out things that have been done well, or perhaps have not.
Some of the best designed things, however, are impactful because we don’t notice the effort that has gone into them; the designer thought hard about it, so the users do not need to. It’s no accident that 3 of the top 10 in Fortune’s updated “100 Best Designs” list originated at Apple, where Steve Jobs placed good, user-centric design and “taste” at the heart of what they do.
In 1988, a seminal book on aspects of product design thinking was published, “The Psychology of Everyday Things”. It later changed to The Design of… as bookshops and libraries were apparently lumping it in the wrong category, it being more about how products should be designed rather what makes us inherently tick.
A few examples highlighted in DOET of things that could be done better include the physical layout of light switches and the lights they operate, or knobs on a cooker vs the position of burners or hotplates they control.
Often the controls are in a straight line across the front of the cooker, but the elements or flames are in a square. To make it easy for you to know which knob works which heatsource, a simple and obvious symbol is positioned nearby. Better hope those don’t wear off over time.

Wouldn’t it be easier for the end user if the knobs were placed in the same pattern as the burners? That way, you wouldn’t need a symbol to inform you; instinct would make you start with the correct one (assuming you were paying some amount of attention).
Another example is door furniture. On the types of corridor doors which you’d find in offices or public buildings, it’s not uncommon to put a handle on the door. Instinctively, you will grab a handle if offered it, and the first thing you’ll do is to pull it (as DOET puts it, that is the action which the handle affords you). That’s fine if the door opens towards you (or swings both ways), but if not, you’ll instinctively pull it first before realizing it doesn’t move and therefore needs pushing.

Similarly, if all the door shows is a blank pad, you’ll open your palm and give it a push. No need for a sign to tell you what to do (well, unless you’re from Midvale).

Aesthetically, glass doors might look better with a handle on both sides but function over form should mean they’d look better still without a push/pull sign, and they’d be easier to use.
Even London’s Design Museum falls foul of the odd rule now and again…
e
A grab handle, on a push door? Sacre bleu! (in mitigation: it looks like the handle could be used to pull the door shut to lock it, but still…)
The DOET book has been updated a few times in its life (since its re-identifying from POET) and is highly recommended.
Controlling everyday software things
For a 20-year-old tome on poor software and UX design, see The Inmates Are Running the Asylum: Why High Tech Products Drive Us Crazy and How to Restore the Sanity. Written by Alan Cooper, “Father of Visual Basic” and respected author on interaction design (a nuanced idea, as opposed to interface design), it’s a fascinating insight into design thinking in a software age.
An example given is of designing the user interaction for an in-flight entertainment system; developers will often institute fiddly directional cursors, modal buttons, controls that need to be labelled so you know what they do. Cooper replaced most with a simple rotating knob; the user will quickly figure out what happens when they turn it right and left. Push the knob to select something, maybe add a Back button and you’re pretty much done.
Bringing things up to date, even though a lot about software and interaction with technical systems could be improved, a great deal of effort is put into simplifying things and trying to remove extraneous UI elements.
 Icons, of course, have their own life – there’s that meme about kids thinking that a 1980s 3.5” floppy disk is a 3D printed save icon. At least if you hover a pointer over most icons, you’ll get a pop-up to tell you what it is.
Windows 11 made some controversial changes to things that power users knew and liked, but for most people they just get used to it and if they ever had to regress to an earlier version, would probably admit they liked the newer one better.
Too many options
The Right-click menu in Windows Explorer has long been cluttered up with lots of options; software you install would add an item to make it easier to operate on that file (Share with Skype! Edit with ClipChamp!). In Win11, many of the lesser used ones were moved to a secondary menu supposedly to leave only the mainstream stuff behind…

Clicking the Show more options menu item (with an icon which looks like making a window bigger) will display the old-school Windows context menu which could easily have 30 or 40 things on it.
Back on the “Fluent” Windows 11 context menu, the very most used options – cut, copy, rename etc – were promoted to icons at the very top or bottom of the menu, and for lots of users promptly disappeared from view.

This is something which is going to be updated in a soon-to-be-released update, to make it easier to use…

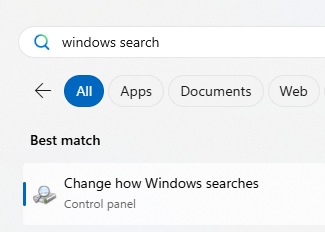
Control Panel Still Alive
Microsoft is still working on replacing some of the last vestiges of old Windows code, just one example being the Control Panel. A key part of Windows ever since version 1.0, it was where you tweaked anything to do with the operating system or the PC. Since Windows 10, most of the key bits you’d configure using Control Panel were migrated to the Settings app but even today, there are some bits of the UX where you’ll fire up an old-fashioned looking Control Panel applet … often buried in the “Advanced” part of Settings, and identified with the square-thingy-arrow-up-right icon, which we learn to know means opening something new…

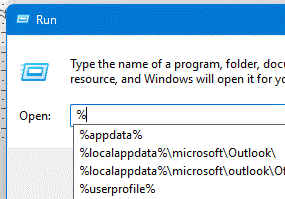
These Control Panel “applets” which remain in Windows can be found by looking in the System32 folder – to invoke any of them just to see what they do, press WindowsKey+R then enter the name of the .cpl file and prepare to be amazed and/or confused.


Gradually, though, these CPLs are being replaced – see desk.cpl – with enhancements to the Settings app, but there’s still life in the old control yet…

expand the Control Panel section in System configuration tools in Windows – Microsoft Support


.jpg)