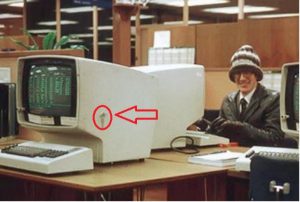
 Back in the 1980s and up to the early 1990s, IBM had many employees – this author included, though most definitely not pictured to the right – who regularly used 3270 terminals to access the Big Iron, and there was a strict policy in place that when you left your desk, you had to lock the screen. In those days, that didn’t mean hitting a keyboard shortcut, but instead, twisting & pulling a key out of the side of the terminal which put it into locked mode. Back in the 1980s and up to the early 1990s, IBM had many employees – this author included, though most definitely not pictured to the right – who regularly used 3270 terminals to access the Big Iron, and there was a strict policy in place that when you left your desk, you had to lock the screen. In those days, that didn’t mean hitting a keyboard shortcut, but instead, twisting & pulling a key out of the side of the terminal which put it into locked mode.
As users moved away from physical terminals to using PCs, there was a need to switch to software-locking of the “terminal” – hence the screen saver or keyboard lock, nowadays activated in many versions of Windows by various means, but mostly simply by pressing WindowsKey + L. If you get into the habit of locking your PC by firing that shortcut, you’ll find yourself instinctively doing so even when you get up from your home office to make a cup of tea. But there’s a new way, being introduced in the Creators Update of Windows 10 – due to start arriving over the next week or two. Dynamic Lock is a feature which means if you walk away from your PC while wearing or carrying a device which is paired to your PC via Bluetooth, then your machine will automatically lock.
Paul Thurrott talked about this feature in a preview build. He makes some valid criticisms, at least for now – there’s no way, for example, of choosing which device will trigger the locking motion, though there’s been a bit more further info on his site about how it works. The idea is that Dynamic Lock should be able to work with a variety of devices (like a FitBit or Band as well as a phone), but for now it appears to be phone-only.
Whatever; if you don’t have Creators Update yet, but you have a laptop with Bluetooth, try pairing your phone now and when the update arrives, you’ll be able to enable Dynamic Lock so you don’t need to lock your machine when walking away. Unless you don’t take your phone with you… Right, off for a cuppa. <WindowsKey+L> |
Month: March 2017
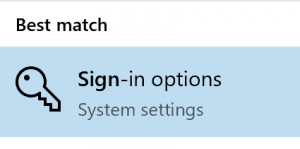
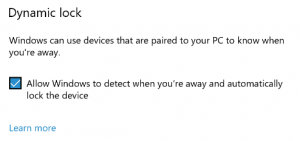 If you’re using a preview build of Windows – or when you get the Creators Update – then try going into the Sign-in options settings, and look under Dynamic lock to enable Windows to detect paired devies moving away.
 Having no current UI to control how the feature works won’t make it unique, though – ever since Windows 10 shipped, there’s been the “
Tip o’ the Week 371 – Enabling 2FA for MSA
|
Passwords are going out of fashion – they’re too easy to guess or hack. We now have a variety of ways to unlock our phones or sign in to services we use, from biometrics to certificates, or even a mixture of methods including behaviours. When you have a username & password, there are two things you need to know but it’s not inconceivable you could lose one or both by being coerced or tricked into action you didn’t expect. Using a mixture of “something you know” (like a username & password) and “something you have” (like a physical token or maybe something on your phone), including even “something you are” (like your face, voice or fingerprint), is arguably more secure, since needing several “factors” means it’s harder for a potential baddy to steal your credentials and impersonate you. With identity theft becoming an ever-present problem, anything you can do to tighten access to commonly-used applications should be considered. Multi-factor authentication (MFA) is the umbrella term for using a combination of several means of authentication, but commonly used scenarios are often just 2FA or two-factor authentication. Twitter, for example, launched 2FA via text to your phone – meaning you need a username/password, the phone number you’ve already registered, and the one-time message they just sent you, to log in. It’s easily possible to enable 2-factor authentication for your Microsoft Account, ie. the credentials you might use to log in to apps on Windows 10, Outlook.com/MSN/Hotmail, Azure Portal etc.
Older devices (like Xbox 360) or older software may not have awareness of 2FA, in which case a specially-created “app password” is required. More recent apps which recognise MSA authentication should support the Authenticator App (available for Windows, iOS and Android).
If you check the “sign in frequently” box on the prompt within the app or service (before tapping APPROVE on your phone), this phone notification will be a periodic or even one-time option – invoked when you’re setting up a new app or access to a service from a new device like a shared computer. It’s easy enough to turn off two-step verification if you don’t like it, and frankly, the first few hours after switching it on might make you feel you’ve made a big mistake – but the blizzard of authentication requests soon dies down and it becomes an occasional thing you need to do, but you’re safe in the knowledge that your Microsoft Account is a little more protected from hackers. |


Tip o’ the Week 370 – Using Bookmarks
|
If you are sending out very long emails with multiple topic sections (good examples might be a departmental newsletter, or confirmation of the reader’s registration at an event, where you’ll have numerous parts they’ll want to refer back to later), then careful use of bookmarks to form a table of contents at the top can make it a lot more palatable. Outlook | OneNote | Excel | Other Apps Inserting Bookmarks in Outlook
To define the bookmark, just position the cursor where you want the bookmark to be, then select Bookmark, to bring up the dialog to the left. Now, the only real gotcha with this is that if you already have bookmarks defined, it’s quite easy to unwittingly overwrite them as the default behaviour of the dialog is to select the next bookmark following your current cursor location, within the list – so if you inadvertently just hit “Add”, then you’ll replace that selected bookmark with the current place of your cursor. To add a new one, just type a unique name and press Add, the dialog will whack it on the list.
To place a link to a bookmark, from your table of contents or a little navigational summary such as the one above this paragraph, just select the text and press CTRL-K or pick Link from the Insert menu, then select Place in This Document, pick the named bookmark, press OK, and you’re done. Using Bookmarks in OneNote OneNote 2016 (the proper, full-fat, desktop version, rather than the UWP one) has a different approach, in that you can link to pages directly, or in fact to individual paragraphs, and instead of defining a specific bookmark, you just copy the specially-formatted URL to the location within the OneNote notebook. If it’s just a page you want to link to, you can select it from a drop-down list box, activated by the usually insert-hyperlink shortcut, CTRL-K, or Insert > Link from the menu.
Once you have the link in the clipboard, just do the CTRL-K thing again at the point you want to activate, and paste your funky (and quite probably, long) OneNote URL in to the Address: box in the Link dialog. You can use that same URL in other places, too – in Word documents, email messages etc. You may find that it’s a bit confusing though, as the default link type is a reference to the location within your OneNote setup (eg onenote:#Home%20Network§ion-id={8ABBAD15…), which may not be resolved correctly when someone else clicks on it. It’d be safer to locate & copy the URL using the same technique as above, then paste it into an email or Word doc, whereupon you’ll get 2 links – one, with text as the title of the section and a link to the OneNote version, followed by (Web view). The latter may be safer for sharing more widely as you won’t require readers to already have the OneNote notebook open within their app. The UWP version of OneNote has similar capabilities, though only links to pages and sections can be created from the navigation UI.
Excel references Excel doesn’t really do bookmarks, but can jump directly to cell references or named ranges, if you’ve defined them. Insert the link by right-clicking in a cell, using the Insert menu or pressing CTRL-K.
|


Tip o’ the Week 369 – Edging forward?
|
It’s easy to think that everyone does most of their browsing on mobile devices but that’s not quite the case, yet – though it’s now more common to use a mobile than either a PC or a tablet. Still, if 45% of all browsing is still being done on a desktop machine, it’s interesting to see the spread of usage – here’s the UK’s desktop browser market share since Windows 10 was released:
So, it’s pretty clear that Chrome (in green) is the de facto browser. IE (dark blue) has dropped 11% and Edge (light blue) has crawled up to 7.5%, with Safari and Firefox oscillating one or two points up and down but more or less holding station. Expanding the view to worldwide, shows that Firefox is more popular overseas (it’s the most popular browser in Germany, for example). Have a play with the chart above until it shows you some data you like. InfoWorld published a recent report citing “13 reasons not to use Chrome”, some of which are pretty bogus but others may warrant attention:
Of course, preference plays a big part in why people use any tool versus another. Why not try something different, though? You can always revert back if you try a browser and decide you don’t like it. Edge is getting better with various releases, with more to come in the next couple of months with the Creators Update. If you fancy trying Edge out as your default, check out WindowsCentral’s excellent guide. |


Tip o’ the Week 368 – Mail and Calendar apps mature
|
Ever since Windows 8 came out, the The Mail & Calendar apps are essentially joined now – though you still have “Mail”
Both mail and calendar functionality is getting advanced enough, you might choose to set up Mail and Calendar for your work/Office 365 email account, rather than bothering with installing Outlook on your home PC or companion tablet device.
Another notable new feature in Calendar is dubbed “Interesting Calendars”, optionally added alongside and sourced from a variety of publishers surfaced via Bing, and tailored for you based on locale. If you have multiple mail accounts set up, you can choose which one to add your “interesting calendars” to, by checking under the Settings > Calendar section (note – to get to the calendar specific settings, he app needs to be in the calendar view at the time, then invoke settings by clicking on the gear wheel in the icons on the bottom-left).
If you add a custom calendar to your Office 365 account, the same one will be visible within Outlook too, under the “My Calendars” group.
Handy if you’re using the Mail app on a touch device (from a cheap 8” Windows tablet to a Surface being used in tablet mode).
For a history of new features in Mail and Calendar, see here (though since that page doesn’t list version numbers and also doesn’t look comprehensively up-to-date, YMMV). |


Tip o’ the Week 367 – Shortcut keys and Taskbar
|
One set of oft-overlooked shortcuts that have been around since Windows 7, deal with switching between applications. Yes, you can use the venerable ALT-TAB method (or even WindowsKey+TAB, if you want to recall the heady Flip 3D days of Vista, or make use of the multiple desktop feature in Windows 10) to flick between open applications, but if you’ve multiple applications running or have pinned apps to the Task Bar then there’s a more direct and arguably simpler way. The Taskbar goes back to Windows 95 but has grown a lot of functionality over the years If your Taskbar is in the traditional horizontal position and if you have nothing running and nothing pinned to it, you’ll see if fill from left to right as you open apps up. If n is a number from 1-9, you can use WindowsKey+n to jump to those apps which are open as if they were numbered from the left. If you are a bit more north-south in your approach and keep your taskbar tucked to the side, then it will go 1-9 from the top.
If you’re disciplined about this, you could have it that your browser of choice is always app #1, Outlook, app #2, etc. This would mean it’s easy to switch between apps, but also to start up apps which are pinned but not running. In the vertical taskbar example shown on the right, the Amazon Music app and Microsoft Word are not running (no blue line to the left of the icon) but the others are; Edge is pinned, but Outlook & Mail might just be active, but not pinned. If you use Amazon Music, the Win32 program has such poor support for common conventions of UX (despite being an otherwise decent app, especially if you’re a Prime or Music Unlimited subscriber), little things like pausing music can be a right pain – it doesn’t support the Pause key found on many keyboards, and doesn’t offer any system-wide control keys to navigate music… the app needs to be in the foreground for anything to work. A solution to hand can be to pin it to a static position on the list (let’s say #1), then press WindowsKey+1 to jump to it, and SPACE to pause or left & right arrow keys to jump back & forth in the current playlist. Similarly, if Outlook is in #4 on the Taskbar, then WindowsKey+4 followed by CTRL-SHIFT+I will always take you to Inbox, and CTRL+2 will take you to Calendar. If you want to check what’s going on in your schedule, this quick sequence (WinKey+4, CTRL+2) can be a great time-saver in jumping straight to calendar whatever else you’re doing, followed by CTRL+1 to jump back to the mail folder you might have been in previously. |


Tip o’ the Week 366 – Night, Night, screen light
|
Good advice might be to have no screen-time within 30 mins of going to bed, but good advice tells you to not eat bad food, drink bad drink or inhabit bad habits. And when do we ever follow good advice? A tactical solution might be to limit the blue light bit of our screen at night-time; it does appear to help, though avoiding electronic over-stimulation immediately before sleep is probably best, as a general rule at least. Should you need to use a PC, tablet or phone just before bed, there are a variety of tools to help. 4½ years ago, ToW #120 talked about a cool bit of software called f.lux which can tune your PC’s – or other device’s – screen, so that at certain times of the day, it reduces whites to be more pinky, by dialling back the blue light.
The Night Light options live under the Display settings; off by default, you can turn the feature on then configure it to change the hue of the screen either at a set time, or following the sun.
|


