As spring continues to emerge from its wintry slumber in the northern hemisphere, it could be worth spending a little time tidying up your Outlook calendar as well as spring cleaning your nest. The following applies to Outlook on the PC, though similar colour-coding concepts exist for Outlook Web App and on other platforms.
You could start by looking for “Ghost meetings” – those are ones where you’re the organizer, but none of the invited attendees have accepted your invitation. A good example is a 1:1 meeting when the other party is on holiday – they might have declined a meeting but you left it in your calendar.
![]() To quickly view Ghost (or maybe Zombie?) meetings in your calendar:
To quickly view Ghost (or maybe Zombie?) meetings in your calendar:
- Download this ZIP file and open the downloads folder where it is saved.
- Right-click the ZIP and choose Extract All then right-click the resulting file and Unblock it, so Excel will let you run the macro within (don’t worry, it’s perfectly safe).

- Now open the file in Excel. If asked, tell it you want to edit the file and allow macros to run, then hit the Scan Calendar button. You’ll now get a list of meetings to go and delete, or possibly to nag the invitees to respond.
Another trick is to colour-code your appointments, either by setting categories on them individually or by using rules. This way you could quickly differentiate an appointment (ie something you put in your calendar to block out time) from a meeting (ie an appointment which you invited others, or to which you have been invited).
 Setting a colour category is a quick exercise once you have the categories defined – right-click on an entry in the calendar to pick a category, or you can set it from Categorize option on the Ribbon while creating or editing an appointment or meeting.
Rules are set by creating instructions that apply to the view you’re using; go to the View menu on the ribbon and choose the View Settings menu item.
This presents a somewhat old-fashioned looking  dialog box which lets you change the view, including using Conditional Formatting, where you define rules that will mean the select colour applies.
In “My Meetings”, if your name is the organizer, then the meeting shows as green.
Explore the conditions dialog a little and you’ll see all kinds of things you can filter by. It includes a powerful advanced mode that will let you set a condition on any property of the meeting or appointment (so you could have different colours for meetings whose locations were in different buildings etc).
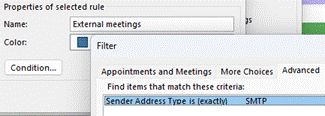
The “External meetings” condition above does require further hoops to be jumped through to get it set up, but it’s a one-and-done exercise. It involves adding a custom form to Outlook, which in turn exposes a new property called “Sender  Address Type” – if the value is SMTP, that means the message – or calendar meeting request in this case – came from outside, so you’ve been invited to a meeting organized by a 3rd party. The same field could be used to colour code your inbox so as to prioritize emails differently too.
To see how you could use the Sender Address Type to alter how your inbox is displayed, and for the instructions on how to install the form so that field becomes visible to Outlook, crank up the time machine and head back to Tip o’ the Week #275 – Prioritising External Email – Ewan Dalton’s Tip o’ the Week (tipoweek.com). Great Scot!


