|
Many Southern Hemisphere nations have already moved into “summer time”, though a few will make the transition on 4th November. Europe, most of Mexico and parts of the Middle East will move out of DST this weekend, but most of the North America and the Caribbean will “fall back” the week after. See the list of places that currently observes DST and when they transition. This can play havoc with people’s electronic calendars; systems these days generally take notice of time zone changes pretty well and that means the relative times of meetings are preserved, though what this does mean is that a 9am meeting organised in Seattle (and therefore hosted in Pacific Time) will be 5pm for attendees in London this week, but it would be 4pm GMT the week after, then back to 5pm after that, as the US moves clocks back. This topic was covered 3 years ago in ToW #301, and most of the tips contained therein are still valid today. Maybe future generations will stop the winter/summer time flip-flop effect altogether (Californians get to vote on whether to join their neighbours in Arizona, by staying on the same time zone all year, and the EU may stop the practice of changing clocks too). In the meantime, for a few weeks a year, those of us who deal cross-border may need to think a bit more about what the time is in our neighbour’s locale.
One further innovation since the last time this topic was aired, is that Outlook now lets you show a third time zone in calendar if you so desire. |
Tag: Windows 10
Tip o’ the Week 449 – Snipping Tool gets the snip
 As mentioned in ToW #447, there are some tweaks coming in the Windows 10 October 2018 update, which might be with us sooner than you think.The old Snipping Tool (not to be confused with the similar screen snipping utility that’s installed if you have OneNote 2016, activated by pressing WindowsKey+S) is going away, and giving way to a new program. And some people aren’t happy about it (in fact, if this was a story which features on the sponsored clickbait tiles on the Edge browser homepage, it’d be described as Microsoft Has a New Trick, and These People are Furious About It…). As mentioned in ToW #447, there are some tweaks coming in the Windows 10 October 2018 update, which might be with us sooner than you think.The old Snipping Tool (not to be confused with the similar screen snipping utility that’s installed if you have OneNote 2016, activated by pressing WindowsKey+S) is going away, and giving way to a new program. And some people aren’t happy about it (in fact, if this was a story which features on the sponsored clickbait tiles on the Edge browser homepage, it’d be described as Microsoft Has a New Trick, and These People are Furious About It…).
If grabbing a free-form selection, once you’ve more-or-less completely made a shape and when you release the mouse button Despite the fact it’s a Modern App and People With Too Much Time On Their Hand Think This… is a bad thing, it’s actually pretty snappy and provides a useful polish to one of the more esoteric but handy features in Windows.
Of course, another method (useful in the preparation of this very note) is to rely on the old PrntScn button, the pressing of which dumps the contents of the screen – floating toolbars and everything – straight into the clipboard. Paste the contents into MSPAINT, then use the Snipping method above to grab the relevant section of your screen grab, and you’re sorted. |
Tip o’ the Week 447 – October is usually boring
|
If you get excited about updates to your computer’s operating system, however, October is going to be a bit more interesting, as the next release of Windows – hitherto known as Redstone 5 – will be with us. Read more from MJF, and see a good summary of what’s coming, here.
There’s a great new cloud-oriented clipboard experience that can be enabled (it’s off by default, so no need to get spooked), and there will be an improved screen snipping capability – both examples of the kinds of supposedly small improvements which can make a big difference to anyone with more than one PC. And both of these are features that have been proven using “Garage” projects in the past. The Your Phone app discussed in ToW 442 will be available to all, too. The much-anticipated “Sets” feature isn’t coming this time, though. So keep ‘em peeled over the next few weeks, for the appearance of the October update. Maybe more news will come at Ignite. |
Tip o’ the Week 446 – What’s brown and sticky?
|
A: A stick… Q: What’s yellow and sticky? Yes, the Post-It note (which has gone on to spawn many imitators, sometimes known as just “stickies” or “sticky notes”) was essentially invented by accident almost 50 years ago, by a scientist at 3M who was trying to make a super-strong glue but instead came up with one that didn’t really stick very well but was at least reusable and didn’t leave any residue behind. Of course, the real story is a lot less simple – the product really took more than a decade to perfect, and convincing people that it was a viable business took several attempts, but eventually it went on to be one of the most-bought office supplies in history. The digital equivalent has had decades of evolution too, from a simple note app from the company that brought you Tiny Elvis to the Sticky Notes application that shipped with Windows 7, and innumerable similar apps in the various mobile and desktop app stores. Starting with the Windows Insider “Skip Ahead” community (but soon to roll out wider), the Microsoft Sticky Notes app has been heavily revised, consolidating the multiple windows that would typically be left on your desktop with a single list, and then pop-out notes that feature multiple colours, support for ink, cross-device syncing and more. Keep an eye out for the Sticky Notes 3.0 arrival on your PC. As MJF says, with the same team now responsible for OneNote, To-Do/Wunderlist, and Sticky Notes, it’ll be interesting to see how deeply integrated they get. |
Tip o’ the Week 445 – Finding Modern App names
|
As detailed in ToW #443, If you’re looking for the shortcut name for your favourite app, there’s a somewhat lengthy process to find out what it is, but at least you only need to do it once…
Try the following:
|
Tip o’ the Week 444 – Computer! Computer!? Hello Computer?!?
|
If you’re an Amazon Echo or Sonos One* user, you’ll already be familiar with barking orders at an inanimate object. If you’re tired of shouting ALEXA… ALEXA!!!, then you can even change the “Wake Word” on the Amazon devices – but not yet others – so you can say other things instead. Handy if your daughter or your dog is called Alexa.
Anyway, who can pass up the opportunity to pretend to be Mr Scott?
Anyway, recent announcements saw the preview of Cortana joining hands with Alexa and allowing access both from Windows 10 PCs to (some) Alexa functionality, and US-based Amazon users can access Cortana stuff through Alexa-enabled devices. On your PC, Voice-searching on the PC using Cortana can be a pretty handy thing to do, as there are plenty of phrases that will give you a direct response rather than take you to a website. It’s quicker to press the WindowsKey+C option than to say “Hey Cortana”, and you could ask stuff like M-S-F-T, what’s the time in New York, what’s the news, what’s the weather, convert pound to dollar and so on.
You’ll also need to grant permission to share info between the two services, and now be able to do things like add items to your Amazon shopping list from within the Cortana UI, or in the reverse, query your Office 365 calendar from your Echo smart speaker. YMMV at the moment, but it’ll surely get more integrated in time. Right now, you can’t stream music through Alexa to the PC (or, it seems, control smart home devices that work through Alexa, though that could be a regional thing for the moment) – and if you’ve a UK-based Amazon account, you can’t add the Cortana Skill to your Alexa account, so there’s no option of querying Cortana from the Echo, yet. US users can, though. Still, Normal People don’t have electronics listening to everything they say… so what if a few nerds need to put up with some temporary friction from having two competing assistants try to work together? Click-Over-bzzzt. |
Tip o’ the Week 443 – Starting modern apps
Apps pinned to taskbar The taskbar in Windows obviously shows you what’s currently running, but can also be used to pin frequently accessed apps or – by default at least – those that Windows thinks should be frequent (Edge, Store, etc – right-click on them to unpin if you disagree). You’ll see a highlight line under the apps that are running, so those without the line are simply pinned there. If you start typing the name of a favourite app at the Start menu, If you drag the pinned apps around, they’ll stay in that position relative to each other, and new apps will always start to the right (or underneath, if you use a vertical taskbar, as you really should). Now, if you press WindowsKey+number, you’ll jump to the app that is n along the line, and if that app isn’t running, then Windows will start it. So in the picture above, pressing WindowsKey+2 would start Edge, or WindowsKey+3 would bring Outlook to the fore. Shortcut to desktop
Assuming your Start menu isn’t full screen then you’ll be able to drag icons or tiles from the menu to the Desktop, and if you right-click the shortcut and look at Properties, you’ll see a Shortcut key: This method differs from the taskbar one above, because each press of the shortcut you set might start a new instance of the app (if it supports that) – which may or may not be desirable. If you end up with several windows of OneNote, for example, you could cycle through them by repeatedly pressing the appropriate WindowsKey+n as above. Keep on Running There’s no better mark of being a real PC deity than by launching your apps through running the executable name… you know the drill? WindowsKey+R to get the Run dialog (it’s so much faster than pressing Start), then enter the app’s real name and you’re off to the races. winword, excel, calc, notepad… they’re for novices. The genuine hardcases might even dive into the (old fashioned, obvs) Control Panel applets like ncpa.cpl rather than navigating umpteen clicks. Looking at the shortcut to OneNote’s modern app above, though, it’s clear there isn’t a simple executable to run – onenote will launch the on-life-support OneNote 2016 version. Many modern apps do, however, let you launch them from the Run dialog by entering a name with “:” at the end… Examples include:
|
Tip o’ the Week 442 – Whose phone? Your phone…
|
If you’re an Android user, and a Windows Insider, then you can get a preview version of the Your Phone app for the PC; after starting the app on the The Your Phone app actually uses a Wi-Fi connection on the phone to sync content with the PC – they don’t need to be on the same network but they do need to be able to talk to the back end service that coordinates things. For now, it just does photos (and only on Android), but in time, more services will be added. See more details here. And here.
Some features of Your Phone will be tied to particular preview versions of Windows 10 – such as the recent latest build, 17228. |
Tip o’ the Week 440 – Break out the whiteboard
 Teachers of any tenure will probably have used a blackboard, with the dusty chalk and the other paraphernalia that goes with it, and be thankful that whiteboards came along to make things easier. Many companies will have whiteboards in meeting rooms too, and most will have the good sense to never allow permanent marker pens within 100 yards of the whiteboard, and to throw away whiteboard markers when they stop working well, rather than put them back and pick up another one… Teachers of any tenure will probably have used a blackboard, with the dusty chalk and the other paraphernalia that goes with it, and be thankful that whiteboards came along to make things easier. Many companies will have whiteboards in meeting rooms too, and most will have the good sense to never allow permanent marker pens within 100 yards of the whiteboard, and to throw away whiteboard markers when they stop working well, rather than put them back and pick up another one…
The Surface Hub 2 will be with us in 2019, and looks like a great step forward while mimicking some of the flipchart form factors of old. Just make sure no clown goes near it with a flipchart pen… Before the gorgeous-looking SH2 appears, there is some news for 1:few collaborators who like to use a smart board, especially if they’re not in the same room – the general availability of the Microsoft Whiteboard store app. Get it here. Oh, and Teams has a free version too, now… Go forth and collaborate! |
Tip o’ the Week 439 – Go! Go! Go!
|
But if you haven’t been hiding under a rock for a few weeks, you may have seen news about the Microsoft Surface Go being announced. Is it an “iPad Killer”? No. The tablet market is pretty saturated, and even if potential buyers of one device flock to the Go, it’s not likely to be kryptonite to the other. It’s probably more likely that the Go exists to appeal to potentially erstwhile Chromebook buyers, in sectors like education, or as companion device to existing Windows fans in the same way that some people use a tablet as a PC alternative when they travel. Given its performance, the Surface Go is likely to be a useful 2nd machine for many PC users, rather than an alternative primary device – though some early reviews seem to make it sound pretty good. MJF reckons many variants (LTE, 8GB RAM/256GB SSD) will be forthcoming, so maybe the mix will change in time.
Oh well, start saving up now – or wait until late August and decide (after playing with it in the flesh – in store, maybe?) if it’s the right thing for you. |


 The new
 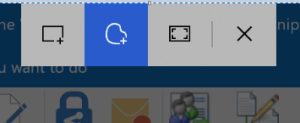 olbar at the top of a greyed-out screen, making it quick and easy to either grab a rectangular portion of the screen, a free-form selection, or the whole screen itself.
 you’ve been holding down, then a large “toast” appears in the bottom right of the screen advising that it’s now in the clipboard. If you click on that,
  you’ll be launched into the Snip & Sketch app, where you can do various tweaks to your grab, save it, share it and so on. An alternative to the Win+S method of invocation is to go into Snip & Sketch to start with, and initiate a new screen grab from there.
 Handy especially if you prepare any kind of training documentation, or you’re stupid enough to send out a weekly tips email to thousands of people for 9 years.


 there are ways of running Modern Windows apps from a script, command line or maybe just from the WindowsKey+R Run prompt – so you don’t need to use the mouse or your finger to activate them.
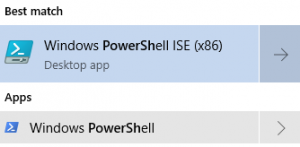

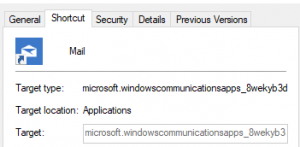 Now, you might be able to figure out from the Name line in the text, which app the following details pertain to, but it’s not always obvious – take the Mail app, for example … if you have it pinned to the Start menu and then drag/drop it onto your desktop to create a shortcut, you can see the target (which is the same as the PackageFamilyName attribute in the text file) is a bit more opaque…


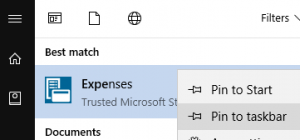 then right-click on it in the list, you can choose to pin it. So far, so good.
 You could try an old-
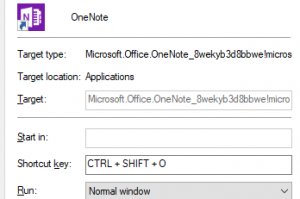 option… just press some key sequence that makes sense to you and press OK to save.


 As we move to a more digital future, the days of the whiteboard – like the


