661 – Finding mail and slimming down

clip_image002

Learning how to find stuff in email is crucial, since many of us get so much that we let it accumulate until eventually it becomes a problem. Sifting through the many cc’ed work mails, or finding the order confirmation email in your personal mailbox amongst all the other stuff, we’re more reliant on search than ever.

This is a topic that has been covered numerous times in previous ToWs – 573 – Searching in Outlook and 504 – Searching Outlook for example – but is worthy of a revisit since we may have a chance to pursue the fallacy that is Inbox Zero over the next few weeks. And maybe it’s a time to find and delete the special offer emails and once-in-a-lifetime invitations that may be clogging up our personal mailboxes too.

Work mail

Dealing with desktop Outlook on the PC, there are plenty of tools available to help you find specific messages, in fact there’s a whole toolbar full of them.

clip_image004

As you look to search mail that meets your chosen criteria – it’s from someone in particular, maybe with a keyword in the subject, or that you know has an attached PowerPoint file, you’ll see that clicking the filters and options inserts the actual commands that will drive clip_image006the search, into the Search bar positioned at the window’s top.

Remembering a few of these means it’s quick and easy to search for mail from a person (you don’t need the quotes, really, and you could use just a part of their name) by typing straight into the box. ALT+Q (for query?) sends your focus straight onto the search bar, so if you’re a keyboard warrior, you could ALT+TAB to Outlook, ALT+Q and enter a search command, before your clip_image008 mouse-toting colleagues have even clicked a toolbar. While we’re at it, remember that CTRL+number jumps to the location on the (now vertical) icon bar on the left, so CTRL+1 will normally be mailbox, CTRL+2 is calendar, CTRL+3 contacts, and so on.

Commands could also be used to filter on properties of a message that are not so easily visible through the UI – eg from:ewan messagesize:>10mb or from:nico sent:”last week”. See here for more examples of the kind of thing you can type. Look under Recent Searches to re-run ones you’ve typed before.

Reducing Mail Bloat

clip_image010Is your mailbox size is starting to look under strain (look under the File menu to see how big your ‘box is and what the limit is)? With an active work mailbox in M365, it shouldn’t be much of a risk unless you genuinely never delete anything, but a quick way of identifying the big rocks and getting rid of them may be needed occasionally.

clip_image012clip_image014You could run a one-off search for all big mail as per the instructions above, or for extra control try creating a Search Folder. Expand the folder tree on Outlook’s left side, and scroll towards the bottom, to locate the Search Folders hierarchy, right-click on the top of the tree and choose New …

This will bring up a wizard which creates a query across your entire mailbox or other data file, but which looks like a folder; it’s visible only in Outlook desktop (ie not in web or on mobile) but can be a great way to locate stuff that might be filed away in the darker recesses of your mailbox.

You can choose from some set templates or do your own custom thing entirely. The age of this feature is somewhat given away by the default value for “Large mail”… click the Choose button and enter something meaningful (like 10000 for ~10MB).

clip_image016

This should give you a few easily deleted big mails to at least get any short-term capacity problems dealt with.

Right-click on the Search folder and choose Customize… to give it a better name, or to tweak the criteria.

Home email

If you have a Hotmail / Outlook.com etc mailbox, there may be a more pressing size issue, as over a period of years you might have been signed up to a newsletter every time you buy something online, and without realizing it, those could account for gigabytes of data bloat on your mailbox. If every notification from Amazon or eBay is 400K, they soon mount up to a meaningful size.

clip_image018If you have a free Outlook.com account, you should have a 15GB mailbox quota and if you have the account associated to a Microsoft 365 home or work subscription, you’ll get 50GB.

To check, go into Settings and search for Storage.

The UI for Outlook.com is simple and effective, but one thing it doesn’t do a great job of is handling message sizes.

clip_image020Sort by size and you’ll see a group heading showing which emails are clip_image022the largest (displayed by default with the biggest on top), but nowhere can you find out what the actual message size is.

If you want to do a mass clean-out of your Outlook.com account, then you could try sorting by From, however the UI won’t let you click on the group heading to select all emails from that sender and make it easy to delete them.

The Windows Mail app on Win11 doesn’t offer Size either, not even to sort by.

clip_image024Sometimes, the old ways are the best – you get much more functionality if you add your Outlook.com account to full-fat desktop Outlook, allowing you to change the view, see and sort by message sizes etc. Oh, and yes, you can even set up a Search Folder too. Now, tidy away!

This is the last “regular” Tip o’ the Week until January.

If you’re still here next Friday, look out for next week’s special edition – it’ll be a belter.

Tip o’ the Week 410 – Inbox Zero for New Year?

ToW has covered various strategies in dealing with email (189, 223, 310 and more), but this week’s tip is shamelessly lifted from a LinkedIn article by an erstwhile colleague and media industry leviathan, Tony Henderson.

Tony, it turns out, authored a book a few years back which offered a slightly different-than-the-norm spin on productivity and how to deal with some of the difficulties of the modern workplace. It’s from this tome that he picked some great tips in handling your inbox – perhaps leading to the ability to clear it completely and leave “inbox zero”.

The Eleven Rules of Email

  1. Daily Mail Test – “Never write anything in an email that you would not be happy for your mother to read on the front page of the Daily Mail.”
  2. Responding – Don’t be too quick to respond to email requests – emails are very easy to send, and it is often hard and time consuming to respond.
  3. Expectations – Get people to call you if they want something urgently so that you know whether they are really serious and why they need a response.
  4. Inbox Management – Clear your inbox every day to less than 30 emails (so the list does not reach the bottom of outlook page). Set up folders covering each area you work on – or groups you deal with – and file religiously – even if you have not always read. That way you can go back and review by topic and avoid the stress of an overfull inbox.
  5. Getting Things Actioned – if you are sending an email looking for someone to act flag that action is required by putting ACTION REQUIRED in the title which will mean that everyone who the email is copied will read it.  To make it really clear who and what you are asking you must highlight specific requests e.g.: “Action: Alan to check this issue and confirm.” This approach works well with people you know, but may be ignored by people who you don’t – a good idea to get verbal agreement first.
  6. Getting Your Message Across – If you need to get an email response from senior people who are busy or don’t know you very well.                       
    • Construct your title carefully (perhaps write it as a proposition such as – “Getting final approval for Project X”).
    • Get the message over in three short and punchy paragraphs – no more.
    • If you want approval, ask for it by asking them to merely reply to that email and type “yes”. This works very well as it makes it so easy for them to respond!
    • Remember that people are all really pressured by email but generally always scan the title and first few lines.
  7. Avoiding Inevitable Email Accidents – the speed and simplicity of email will always lead to some mistakes; many of them can be rectified by adopting two simple principles.
    • Set a Delay – Set a sending delay of at least 2 minutes on your Outbox – it gives you just enough time to delete that accidental email. Better still you can set it for specific addresses such as clients.
    • Double Check Addresses – Double check your address lines in email before you send – Outlook auto insert often puts odd names in there.
  8. Arguments – Never, ever have an argument by email – everyone loses and it is recoded for posterity. If you sense a disagreement coming, make a call or organise a face to face meeting and then circulate the conclusions by email.
  9. Favourite Form of Communication – Email is not everyone’s favourite form of communication. Some people are better “live”, others like to use the phone, and others respond to formal letters or memos. Try and find out which form your key people like and use it for important communications.
  10. Circulation List – When you need to respond to an email with a wide circulation on it, you need to stop and think. Do I need to send this to everyone? Is this “thread” wasting a lot of people’s time? (You can be sure that it is).
  11. Interruptions – While internal emails can be a huge waste of time they can also avoid unnecessary interruptions. After you have interrupted someone at their desk it can take up to 30 minutes for them to get back to their original task.
    So while talk is best, email may be a useful method to log a question or thought. Equally making a note and saving it for a lunchtime chat is also a good option.

See Tony’s article here, and The Leopard in the Pinstripe Suit, here.

Tip o’ the Week 408 – sign up for email lists

clip_image001The curse of email is that it’s too easy to send nonspecific content to large groups, meaning it’s generally in everyone’s interests to avoid getting any more. How often do you have to parse some online form where you need to leave the checked checkbox unchecked if you’d like to remain not signed up to receive specially selected offers from our carefully chosen partners?

That said, email distribution lists were an early form of mass collaboration – powered by the likes of LISTSERV, where online communities formed, in some ways an alternative to USENET and the web forums that now host many interest groups online. In the days of LISTSERV, email volumes would be relatively low, and it provided a simple distribution system that fired mail out to everyone on the list, and people could easily join and leave, by simply mailing a JOIN or LEAVE command to the address.

Next time there’s an internal company email storm (the famous Bedlam DL3 storm at Microsoft occurred just over 20 years ago), it’s not necessarily counter-intuitive for people to respond in the “take me off this list” manner, even though the perpetrators themselves are probably unaware of that.

If you find yourself getting unwanted email from marketeers or newsletters you’re not interested in, there are a variety of ways of opting-out – most kosher bulk email tools will allow you to unsubscribe with a link at the bottom; if the email is completely unsolicited, however, then clicking on an “unsubscribe” link in a spam message might just mark you as a real person, and you’ll get even more spam in future. If in doubt, you might want to rely on some of the built-in tools within Outlook, to protect you from further spammage.

3rd party bulk unsubscribe tools like https://unroll.me/ might help clean up subscriptions for consumer mail platforms like Outlook.com, Gmail etc, though exercise with caution as there’s always a risk they’ll just be exposing your data to people you shouldn’t.

Though aggregated news apps and websites are ten-a-penny, there are some very good resources out there that are worth signing up to receive mail from – for example…

  • WhatIs from TechTarget, which gives a Word of the Day email (there’s a big red button on the page, to sign up) which explains a topics word or phrase; you’ll almost certainly know many of them enough to hit delete as soon as you see the mail, but every so often there’s a just-detailed-enough explanation to make it worthwhile. Check out the archive of Words of the Day.
  • Owler is a free, professional, community-driven (crowd-sourced, even) news service that curates news from companies you might be interested in and packages, including a Daily Snapshot email that might be a good way of picking up company intelligence you might otherwise miss.
  • LinkedIn is a great way of getting notifications about people you’re connected with, but can also give you news about companies you want to follow, as well as a curated Daily Rundown page. It’s especially useful if you have access to LinkedIn Sales Navigator (see MS internal learning)

Tip o’ the Week 356 – How not to send mail accidentally

clip_image001An ohnosecond is the small measure of time between a luser doing something seemingly innocuous, then realising the true magnitude of what you’ve done.

Frobbing a scram switch without knowing. The dawning reality that a protest vote might actually result in that thing actually happening. Sending an email to someone you didn’t mean to, that kind of thing.

Fortunately, most of us have a limited ability to truly mess things up (leaving aside Darwin Awards candidates), but something that most of us will have done at some point, is that unintended sending of mail. The situation could come up for a number of reasons:

  • Someone is copied on the mail that you’re replying to, and you either don’t realise or you intended to remove them from the list but forgot. Maybe you went on to theorise about their capability or speculate on their intent. Normally just embarrassing, could be career-limiting.
  • clip_image003You accidentally add someone to the TO: or CC: line of a mail, intending to remove them, but don’t. This is basic carelessness which can be avoided by not adding people to the TO: or CC: lines of your email unless you genuinely intend to send the mail to them… [coming to a Bedlam expansion pack sometime]
  • You Reply-All by default to emails, maybe asking to be removed from the mailing list. Don’t do that. Seriously.
  • You send an email then just after, realise that a later message has changed the conversation and that, if you’d read that first, you either wouldn’t have replied, or if you did, you’d say something different.

There are a couple of easy things anyone can do to avoid these issues, apart from thinking before sending and maybe re-reading all of what you’ve written before sending it to what you know to be a large group, or with important people on the list.

clip_image005

  • DON’T put people on the TO: or CC: line as a way of looking them up in the address book; it’s an easy trap to fall into; maybe you just want to check how someone’s name is spelled, or find out who their boss is, etc. If you want to do that, go to the main Outlook window (ie not the email editor, if you happen to have that as a separate window), and just press CTRL+SHIFT+B to bring the address book to the fore. Or, click the Address Book button on the Home tab, or just type the name into the box above it.
  • Try delaying the sending of new messages – in principle, keeping outbound mail in the special “Outbox” folder on your PC until some period of time before actually pushing the message out to the recipients.
    • clip_image007One option might be to delay specific messages, probably more for impact – if you want people to receive mail at a particular time (following an announcement that you know is going to happen at a set time, for example), then you can force that message to sit for a while – an extended time, maybe – before being put into the sending queue. See the Delay Delivery icon on the Options tab within the message window.
      clip_image009
      One downside to putting stuff in the Outbox is that when you’re running Outlook in the default “Cached” mode, then the Outbox is a special folder on your PC – so if something is sitting there waiting to be sent, and you put the PC to sleep or it goes offline, then the message will stay there until the next opportunity presents itself when your PC wakes up and is online.
      There is a slightly more convoluted way of putting delayed mail in the Outbox on the server – see veteran ToW #30.
    • clip_image011To delay every message for just a few minutes, to give you an opportunity to yank them from the Outbox, then create a rule…
      • On the Home tab in main Outlook window, try creating a new rule by going to Manage Rules & Alerts then, and clip_image013choosing New Rule, then under “Start from a blank rule” choose “Apply rule on messages I send”
      • On the new rule dialog, select “Next” to apply the rule to every message sent (on the “Which condition(s) do you want to check” tab), then on the “what do you want to do with this message” page, select the “Defer delivery” option and choose the number of minutes, then hit Finish / OK to apply the rule and return.

Now, when you send a message, it has the property set that delays it for however many minutes you wanted to wait – if you need to send it quickly (so you can disconnect or shut down, for example) you can go into the Outbox folder, open the message, change the “Delay Delivery” option on that individual message and press Send again.

Tip o’ the Week #282 – Delay your mail

There are several techniques to delay sending messages, something that could be considered good practice – according to Harvard Business Review, for example, bosses who send email late in the night are causing lots of stress as people feel obliged to respond immediately. A counter-argument would be that if people don’t want to respond to emails late at night, one tactic might be to not be reading them late at night in the first instance.

There may be good reasons to be emailing late on, although sometimes the sender might appreciate a delay or a sanity check – like the Google Mail Goggles idea unveiled some years ago, that would check that the sender isn’t steaming drunk when sending mail late at night. Expect the Google Beer Scooter to be along any time soon.

Sometimes, it’s easy to spot that your boss is travelling – if you suddenly get an email dump, then maybe s/he has been offline in the air or on a train, and has used the time to catch up on stuff which only gets sent when they arrive and connect. This is, of course, a good use of time that would otherwise be spent looking out of the window, watching movies on the seat-back screen and/or getting tanked up on inflight vino.

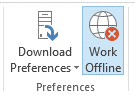
Back on terra firma, if you do need to write emails that may not need to be sent or read over a weekend or during the night, you could try Offline mode: simply go into the Send/Receive tab of the main Outlook window, and click the icon in Preferences.

Outlook being in Offline mode lets you review the emails you’ve got sitting in the Outbox, before committing to sending them, which could be handy especially if you’re bulk-sending. Alternatively, when in online mode, you, you can delay individual emails’ sending time by looking in the Options | Delay Delivery section of the actual message window.

Delay everything

Another safety valve that some people rely on is to slightly delay everything they send – a technique that lets you fish out messages from the Outbox folder in case of accidentally sending them to the wrong person, hitting send too soon, etc.

The trick is to create a rule in your mailbox (NB – if you want to follow these instructions, you may want to arrange your windows so that you can see this on a 2nd monitor, or arrange the main Outlook window and this message side-by-side, as when you start digging around in Outlook rules, you won’t be able to flick back to this message if it’s behind the Outlook window).

  • In the main Outlook application window, go to Manage Rules & Alerts and click on New Rule
  • Select Apply rule on messages I send and then determine if you want to apply some other conditions – maybe you only want to delay emails being sent to certain groups of people or if they contain certain words; if you don’t want to restrict to a given set of conditions, just leave everything blank and hit Next – and accept the fire-and-brimstone warning 
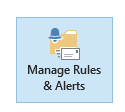
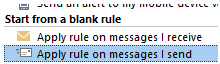
message that this rule will apply to every message…
  • Next, set the timing you want to apply to the rule and hit OK – and when you go to save/apply the rules, you’ll get a warning that this rule will only run on this PC, which is as expected, since it’s a client-side one.
  • Now, be careful – outgoing messages will sit in the Outbox folder on the PC you’re using, but that’s a special folder that exists only on your current machine and isn’t synchronised with the server or anything else – so if you hit send and then immediately close the lid on your laptop, your PC might go to sleep and the email will stay in Outbox until it resumes again…
  • If you get cold feet on sending, or decide you need to edit your missive, just go into the Outbox folder, and if the email shows with the recipient name or address in italics, then it means it’s waiting to be sent – if you open up the mail and then just save it again, it’ll stay in the Outbox but won’t be sent until you edit it again and press the Send button again.

Finally, it’s possible to send mail in the future/from the past when you’re offline entirely. That’s a whole other topic that’s been covered 4 years ago.

Tip o’ the Week #275 – Prioritising External Email

Do you suffer from email overload? The temptation is to get dragged into dealing with all the nonsense internal emails and corporate spam, but it’s worth trying to prioriti(z)|(s)e email from external senders, excepting the genuine bulk guff that you can spot quickly and delete.

Here’s a simple Outlook tip to help; it installs a custom form into your Inbox, which takes some minor faffage, but it’s a one-off process that will stay with your mailbox forever… and it allows you to create rules to prioritise email that comes from outside over the blah-de-blah you get from within.

Here’s a Before & After view of the same mailbox… you’ll guess which emails are from external senders…
{NB: this view was carefully constructed for demo purposes – some of the external emails are clearly bulk mail that could easily be deleted filed, but it shows that anything which originated outside and is still in the inbox, is more highlighted than everything that didn’t/isn’t}

Now to Install the form

The next section involves digging around in Outlook options, which will probably involve a fair bit of flicking to and from this window… and although reading the steps in email sounds horribly complex, it’s actually dead easy to follow if you have it step-by-step in front of you… So you might want to print this article out to make it easier to follow …

Firstly, download this ZIP file to your PC. It contains a couple of icon files and the .CFG file which defines a new form in Outlook, and that form exposes as a custom field, one of the deeply-buried properties of email messages.

  • Save it in your Downloads folder if you like, then open that location in Windows Explorer,
  • Right-click on the ZIP file and choose Extract All.
  • Open the folder where the files now live,
  • Hold down the SHIFT key and right-click on the SenderAddressType.CFG file, then choose Copy As Path

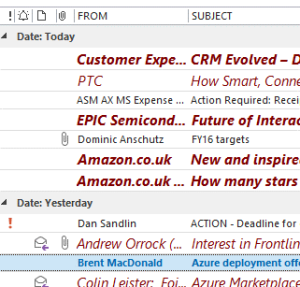
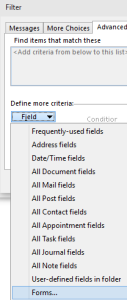
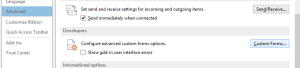
OK, now back in Outlook, go to File | Options | Advanced then scroll down to find the Developers section, and click on Custom Forms…

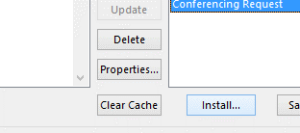
Now, click on the Manage Forms button, and you’ll see a dialog to do just that… click on the button Install, then a dialog box will pop up to look for the form you want to install – paste the location to the .CFG file you Copied as Path above…  You should see the Sender Address Type form appear in the list, after which you may Close | OK | OK to get back to main Outlook window.

Alright, now you’ve added a form which will allow you to expose a field – similar to the usual ones like sender or size or subject – which shows the type of address that sent the email. It’s not infallible – some internal mail comes from SMTP systems, but almost all internal email doesn’t – so it’s actually more a way of filtering out most internal mail than it is a way of highlighting everything external.

Anyway, here’s how to create the above view…

  • When in your Inbox, Go to the View tab in the main Outlook window, and look under View Settings – this will now let you tweak the settings of the current view, in the current folder
  • Click on the Conditional Formatting button in the dialog which pops up – this can set rules on how  emails are highlighted, or not, and is what’s used by default to make unread emails bold, or urgent emails red.
  • Create a new rule by clicking on Add then give it a name, then click on the Condition button. This now sets the  times when the rule will fire – so the best thing to do is go straight to the Advanced tab…
  • click Field and scroll down to the Forms… option at the very bottom, to choose the form you’ve just installed …
  • Select the new Sender’s Email… form, click on Add-> and then Close.  This will then allow you to use that form to choose attributes for formatting. If you later chose to create Search Folders, Inbox rules or other filtering within Outlook, the same process would apply.
  • Still at the Field drop-down, now choose the new form from the list and select the field, Sender Address Type. 
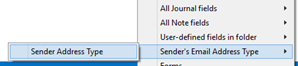
This is the one custom field that was added through the whole form shenanigans above – if the sender was internal, it’s probably either blank or EX, if external it’ll be SMTP.
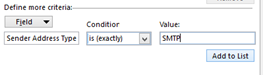
  • Now, set the criteria – if the Sender Address Type is SMTP, then we want to treat it differently – click Add to List then OK.
  • Finally, set the view attributes you’d like on the emails which match this condition – best avoid bold as other rules will probably be setting bold on unread emails, but italics in a different colour and a different size could be a good combination… try it out and if necessary, just go back in here to tweak to your satisfaction.

You may find that the customised view doesn’t show up on every PC, however the form is now installed in your mailbox so should be available everywhere – so if you needed to create new versions of this view, it should be much more straightforward. To edit the view in another folder, repeat the last few steps above (starting from the View tab as above, but this time in your other folder – the form is available all the time so you don’t need to install it again).

Tip o’ the Week #251 – Toasting a new email message

You got a new email – hurray! Back in the early days of using email, it was expected practice for your email program to play you a little fanfare, pop up a message box to tell you that you’ve got mail, put an envelope in your system tray etc.

In the last decade, nobody in most companies needed to know they got a new mail. We all get far too much of it, and yet most email programs notify you by default. Stop that, it’s silly.

The inspirational Prof Randy Pausch advised switching this off: he delivered a great talk on Time Management, and watching it is a better way of spending 90 minutes than pretty much any other productivity-enhancing measure. Children of the 1970s and 80s in the UK will remember Why Don’t You?, with its somewhat perverse advice to “switch off your television set”.

Well, stop reading this email now and go and watch Randy’s Time Management video (same link as above you click junkies).

Still here? If you’ve never heard of Randy, he was diagnosed with pancreatic cancer in 2006 and sadly succumbed less than 2 years later. In the interim, he delivered “The Last Lecture”, an awesome (and we’re not talking Microsoftie, “hey, that was super-awesome!” kind of awesome, more the laughing-out-loud, tears-welling-up and rapt-attention kind) lecture on achieving his childhood dreams. Make time to watch The Last Lecture video if there’s only one video you watch this weekend.

 Anyway, this tip reprises the topic of the very first tip of the week – but this time instead of switching off a pop-up in Outlook, it’s about disabling the “toast” that appears in the top right of the Windows 8 screen to tell you that you’ve got new mail.

In Outlook 2013, go into File | Options | Mail and look under the Message arrival section then un-check the Display a Desktop Alert option.

It’s possible to disable all “toast” notifications in Windows 8, but that’s something of a lumphammer to crack a pine nut. If you want to do it, see here… otherwise, it’s best to control things within individual applications. Within the same menu, you can selectively toggle each app’s notifications setting.

If you’ve configured the Windows 8.1 Mail app to connect to your company email, then you might have the weird experience of seeing an incoming toast from both Outlook (represented as the upper one in the screenshot above, with the fizzog of the sender as represented in the GAL) and within the Win8 Mail app, shown by the different toast below (and possibly a different picture, depending on how the sender is represented in your contacts).

 To disable the toast from the Mail app, go into the app itseld and bring up the Charms (press WindowsKey+C or swipe from the right if you have a touchscreen, or put your mouse in the top right of the screen). Now select the Settings charm, then Accounts, then go into the account you have set up to your corporate emai (since you can set notifications differently per-account).

The “Show email notifications” dropdown allows you to select that you want to allow all email to notify you (bad) or perhaps only to show you mail from your Favourites, as defined in the People app.

Or, of course, to switch off altogether.

Tip o’ the Week #241 – Where did that email come from?

clip_image002Most people don’t really pay much attention to where emails originate from or how they got to be in your inbox. This is clearly exploited by scammers and spammers of all sorts, as many consumers will happily click on a link in a genuine- looking email and not think twice about the fact that it might not be all it seems.

Anti-spam technology has improved a lot in the last decade, so a lot of the obvious junk mail is filtered out before it arrives, or if it makes it as far as your mailbox, it’ll be dropped into your Junk Mail folder. But even though the crooks have gotten more sophisticated, sometimes fishy-looking email is still delivered, but clearly marked as probably not safe, as there are tell-tale signs of it not being genuine.

Here’s an example of a typical “phishing” email that’s trying to lure the recipient into clicking a link to a website they think is their bank, Ebay, PayPal etc. etc.

clip_image004In this case, the URL is shown at the bottom of the window by hovering over it (the mouse pointer doesn’t show up in the screen capture, but it was over the “Update” button). This doesn’t look like a genuine URL; ditto, anything that is displayed in the text as (for example) https://login.youraccount.com but when you hover, you’ll find it’s some other URL. Some scammers are increasingly using TinyURL, Bit.ly or other URL-shortening services to try to hide their obvious dodginess.

Many email programs (like the standard Windows 8 Mail client) try to hide complexity from end users, but if you hover over a link, it will show the URL in a pop-up.

There are other scenarios, though, where the sender isn’t purporting to be a large institution or other supposedly trustworthy source. Maybe you’re selling something and a potential buyer contacts you to offer a quick cash purchase, sometimes in tandem with an overly complicated arrangement of an agent coming to collect your goods, in exchange for some online means of payment. If your Spidey-sense doesn’t pick up a slightly iffy premise to these kinds of offers, then there might be other ways of tracking down the sender.

Every email comes with an “envelope” – it’s actually like a routing slip attached to the block of data that makes up the main body of the message, and every time a computer (like an internet mail server) handles the message, it adds some kind of marker on the routing slip. The most recent markers on the message “headers” are at the top, so to find out where it really came from, parse down and look for the earliest point in the header that shows where the message originated.

clip_image005To see the detail on a message, you’ll need to use a mail client such as Outlook or Windows Live Mail (if you’re using Outlook.com/Hotmail etc, or Gmail), and look at the properties of the message.

In Outlook, open the message in its own window, then go into File / Properties and you’ll see Internet Headers – if the message came from outside the company, this is the key to your sleuthing. Select all the text and  clip_image007right-click to copy it into the clipboard, and paste it into Notepad for easier viewing.

The header information might be incomprehensible (there are plenty of guides online that can help you make sense, if you’re all that interested), and in fact, much of the text could be faked – but it often gives some interesting breadcrumbs.

Above is the header of a message that’s a tad suspect – viewed in Windows Live Mail (open the message, look in File clip_image009/ Properties and look in the Details tab). Looking down the headers, we can see the message originally was sent to Yahoo, and it was handed over to the Yahoo mail service by the IP address listed: 

Received: from [41.220.68.62] by web172005.mail.ir2.yahoo.com via HTTP; Wed, 09 Jul 2014 13:19:54 BST

The sender, who’s offering to buy a car in this case, purports to be in Aberdeen. Now let’s just see where this address is by pasting the source IP address (41.220 etc) into the box on the top right of www.whatismyipaddress.com – or put the IP address into the URL, like here.

Doesn’t look a lot like Aberdeen, does it?