Computers have dealt with files of many types since the earliest days. When the Graphical User Interface took off, it was even seen as a step forward that you could navigate to a file and double-click it to open the application that created it, rather than having to start your word processor and go to File->Open to access a file.
As storage prices have tumbled ($76M/TB in 1985, $6K/TB in 2000 and $11/TB today), and cloud storage has become the default to some extent, then it’s inevitable we all have more stuff, photos, videos, Office documents and more. But search capabilities have not necessarily kept pace, on Windows at least.
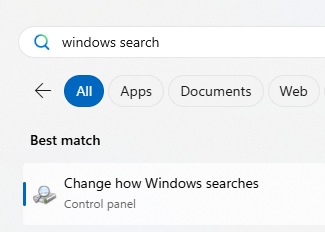
Windows Search
There is an indexing and search feature built into Windows, and has been since Windows Vista for desktop users. It is an evolution of the previous Indexing Service which goes back to NT4 days; basically a background service will notice when files change, and can pick up the data and scan it for keywords.
In principle, you’re supposed to be able to type a search term into the Start menu or the search bar on Taskbar if you have it enabled, and it will find files which contain that word or words in their name, or even in the contents. It’s also used to search Windows own system and settings, so is often the quickest way to get to anything you’d like to change or tune.
The downside is that Windows Search is a little, er, opaque. It can take a while to index lots of content, and if it doesn’t find something then there isn’t much you can do other than try a few switching-it-off-and-on-again tricks before ultimately blowing the index away and recreating it.
Enter File Search
Microsoft has started testing a new M365 “companion” app called File Search, which is used to search files in OneDrive (and only in the M365 commercial OneDrive too, it seems).
It’s pretty quick and does a decent job of finding stuff, as it offloads the actual indexing and searching to the OneDrive service itself. The app itself is a web app running like a Windows app.
When installed, it (annoyingly) starts up at Windows startup; something that can quickly be nixed with the settings menu on the top right. It’s one of a few new companion apps that do other stuff in M365, only one tenant that you’ve signed into (and not working across Microsoft 365 Family as well as M365 school or work accounts, and not working with (MSA) Microsoft Accounts).
Find Everything – well, most things
If Find Search is limited to only stuff that lives in the (M365) cloud, a powerful, free, local application called Everything which searches all the files on your PC could be just what you need.
It searches file names only and starts showing you results as you type, and a quick double-click on the results will have the target file open in a jiffy. There is a preview pane too, so will quickly show you what the file looks like. Everything can search the contents of files too, but since they’re not indexed in advance (and with all the overhead that implies), it’s super slow to give results. Best avoided, really.
The app looks basic but is very fast, and the website looks like it came straight from the AltaVista search engine. Still, it works…
What if we could use cutting edge technology to give us more time to do the things we really want to be doing?
Some online videos have a transcript already published – on YouTube, for example, it’s an option hidden in the description, if the publisher allows it. Clicking the Show transcript button will then display a text stream of what was said, with timestamps alongside.
It’s not searchable, other than by using the browser to try and find text on the page. In the case of YouTube, though, it’s a handy way of jumping straight to a keyword in the video.
If you can get the transcription, you can get it summarised. Why bother wading through hours of corporate chiff-chaff if you could get the tasty bullets extracted for you?
Live broadcasts don’t publish the transcript; clearly, they can’t know what is going to be said and when. Maybe they’ll have live subtitling but that’s tricky to do anything with until after the event is over.
“As live” stuff like corporate events such as Microsoft’s recent MCAPS Start for Partners often don’t make the transcript available ahead of time. Watching these kinds of things in real time, there is one natty technique to get a transcript, even though it does have some shortcomings.
Using Teams, go to the Calendar view and start a new instant meeting…
Once joined, you’ll be the only participant and also the meeting organiser. Now Share the browser tab that is displaying the live video with your meeting; share just the window and make sure you’re including sound (so the sound from the window is getting picked up by Teams).
Now, you’ll be able to Start transcription and Teams will record everything that’s being said.
The downside is that everything is noted as coming from you (since it won’t know who is speaking in the real video) and some jargon might be messed up repeatedly. When the meeting is finished, you should be able to look at the Recap feature and locate the transcript.
Download the text to a Word doc and you’ll be able to do some simple editing like find/replace for common mistakes (in the MCAPS event, “FY20 6” cropped up instead of FY26, or “SME and C” instead of SME&C), and maybe even add in the names of speakers at different points if you know them.
The transcript can be fed to your favourite AI tool later to summarise it. More on that later.
Take Two – the replay of video
Other training vids etc might be published on-demand, and if they avoid sharing a transcript too, it’s still possible to use the same technique as above to capture what’s being said. You might even be able to alter the playback speed so you can capture the text without investing the actual time to watch the video …
Chances are that 4x playback will be a bit too fast for the transcriber to catch its gist. Stick to 1.5 – 2x and marvel at your own genius.
Take Three – they published the transcript!
Oh, frabjous day! If your video of choice does have a published transcription, it’s likely that it will have correct speaker names, and the creator may have tidied up any mistakes in capturing jargon or abbreviations.
In the case of the Microsoft MCAPS Start event referenced earlier, they did share the transcript as a .VTT file, a format used to define subtitle displays so it’s very chopped up and has timeline information too. Not easy to read, particularly, but we can overcome that.
Click the … option on the control bar and you may see Transcript options; in this case, you can search for a keyword and jump directly to that point in the video, or click the little arrow to download a copy to a VTT file. It’s just a text file that can be opened in Word or Notepad if you insist; it would be worth saving it to your PC and renaming it to something.txt.
Feeding the Copilot
In this example, however you’ve arrived at a transcript file, lucky subscribers can use M365 Copilot to make it summarise the information. ChatGPT would surely do similar, and as long as the video is in the semi-public domain, there’s no worry about sharing all your secrets with OpenAI.
Here’s an example prompt for Copilot:
Using the attached transcript, generate a well-formatted word Document with 1. 2-page summary in short sentences and bullet points, paying particular attention to key announcements (particularly on program changes and investments) and any data points being used, 2. A 4-page summary of the key themes, any calls to action and take-aways from the content. 3. the actual text of the transcript ordered neatly into paragraphs of English, highlighting speaker names in bold.
Paste this prompt into copilot.microsoft.cloud and click the + icon to upload the .TXT or .DOCX transcription file you have already saved.
Give it a short while and you should get the document ready to view…
Using this prompt gives a short bulleted version, but asking Word to generate a longer summary in Copilot within the app might also provide a useful bit of readable text at the top, too.
You can tweak the level of detail with the drop-down menu on the lower left fo the Copilot option in Word. Selecting “Detailed” in this example will give a 2-3 page summary of the hour-long transcript, well formatted and easy to read.
When Windows 95 appeared almost 30 years ago, it made a big thing about the Start button and the menu that went behind it. The Start button on the screen – and on the keyboards of newer PCs – was the way to quickly get to everything.
Fast forward to today and the Start menu is visually more arresting and comprised of different categories of icons. At the top are Pinned applications (which may or may not be things you’ve pinned there; Microsoft or other app providers might have decided you want them front and centre). Then there are apps or documents “Recommended” due to your usage habits.
Microsoft is still tweaking with what to put on the Start menu: there’s a new update coming which includes categories of apps, too.
The problem with any arrangement of icons is that when a user goes to access something, they need to figure out where the icon is; frequently used apps might get pinned to the Taskbar for easy startup via muscle memory, so the actual Start menu is infrequently accessed for day-to-day apps. Also, many people live in the browser so they might never need an app to be invoked through an icon.
Start to Run
A more consistent way for launching an app might be to press the Start button then begin typing the app’s name. If you don’t have Excel pinned to your Taskbar, for example, it could be quicker to just press Start and typing excel <enter> to launch, than pressing Start and fishing about with your mouse to find wherever the icon is.
The same UI promises to help find documents you’ve used too, so if you know what you want to open with Excel, you could try that instead (eg timesheet…).
Hardcore Runners
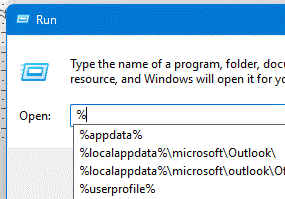
For true keyboard warriors, there’s no better shortcut than WindowsKey+R, which launches the simple Run dialog. Generally speaking, you need to know the name of the program’s executable if you want to fire it up from here – eg. Entering “word” won’t get you anywhere, since Microsoft Word is actually winword.exe.
It does keep a useful Most Recently Used list of commands and some Autocomplete logic, though, and entering the name of a folder will open that in Explorer.
There are lots of built-in variables that can jump to places in Windows:
%userprofile% is your own home directory
%onedrive% jumps to wherever your main OneDrive folder is.
%windir% takes you to Windows own director, and can be combined with others like %windir%\system32
To see the full list, drop to a command line and enter set. Everything in the list could potentially be used if you strap a % in front and after it.
Ultra Running
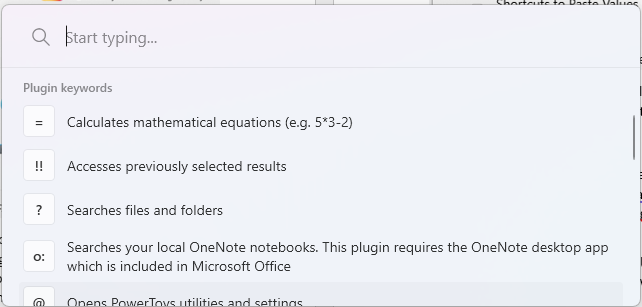
If the Win+R command is too namby-pamby for you and you prefer not to take your hands off the keyboard, there’s another super tool that’s part of the PowerToys package – PowerToys Run. Arguably not really a “Run” or even a “search” function, it provides both with a slew of additional commands and features that can jump straight to different parts of Windows.
Press the shortcut key sequence to launch it (as long as PowerToys is running in the background), and you’ll get a floating window right in the middle of the screen. There are quite a few “operators” which direct it to search, from using the keyboard to loop through the current windows, to searching OneNote.
Fortunately, PowerToys Run can have its invocation re-assigned to, say, WindowsKey+SPACE.
Start a command with “.” and type the name of an app, and you’ll get a suggested list – not just from the app’s name but from its executable, so you could quickly see what to enter into WindowsKey+R in future, for the sake of saving a few seconds.
Every email or productivity application which deals with contact info has some attempt at being able to sync, export or import contacts from elsewhere. “Attempt” being the operative word as you’re often left with a flat text file (or CSV) which might need some form of manipulation before it can be imported. Using Export & Import could be the simplest way of copying contacts from one account to another, or even cleaning up duplicates by exporting / fixing / deleting from the source / re-importing.
… while Outlook (classic) has a UI which hasn’t changed much in the last 20 years:
Export from company address book
What if you want to batch-export a load of contacts for colleagues from your company’s address book? Let’s say you’re a group going away on a conference and you want everyone’s number so you can keep in touch? If you’re using Exchange Server on-premises or Microsoft 365 for email, then there’s a “default Global Address List” which has everyone in it. It might also have phone numbers, job title, department and other info, besides just a name and an email address.
Using New Outlook or Outlook Web app, you can only really operate on a single entry at a time, so it could be a drawn-out exercise to pick everyone you want and copy them to your own contacts.
It’s pretty easy using classic Outlook to add multiple contacts from the GAL. Open the Address Book (another piece of UI which is largely unchanged since the original Exchange client released over 30 years ago); SHIFT+CTRL+B is the fastest way to fire it up.
Hold the CTRL key down while you click on multiple names, then right-click on one of the selected ones and choose Add to Contacts. So far, so good. But what if you wanted to add dozens of contacts from Aaron to Zebedee, and you had thousands of entries in the GAL? It could be a bit of a faff to scroll, multi-select then Add to Contacts. If only there was another way.
Exporting the whole Offline Address Book
Speaking of faff, here is one technique which will export everything to a CSV file and then let you filter, sort and ultimately export just the stuff you want. You might be able to do other things like take a snapshot at quarterly intervals, then use Excel to compare the CSVs and see who has joined, left or moved department, changed job titles and so on. Quite Interesting, no?
The source of this goldmine is the Offline Address Book which Outlook (classic) keeps on every PC that’s connected to an Exchange/M365 mailbox, so the user can still see the address list when they’re offline. Now this technique isn’t necessarily for the faint hearted, but at least you only need to do the bulk of it once and then run a simple script whenever you want to extract the data from the latest OAB. It’s not exactly rocket science.
The OAB is held in a bunch of files on your PC’s disk; the format is uncompressed so if you’re foolish enough to open in, say, Notepad, you’ll recognize some text but there’s a lot of other stuff in there. Fortunately, some enterprising techies have pulled together a script that quickly rips through an OAB and delivers a neat CSV of users, and another of groups or mailing lists.
Step One – Install Python
OK, this would send most people running for the hills, but on a Windows PC it’s reasonably straightforward (and for the purposes of the rest of this example, we’re assuming you’re running Windows – if you’re a Mac or Linux user then you’ll need to figure it out on your own). As said, this is a one-off activity, to install both the Python scripting language, and the oab script that we’re going to run later.
Once the install has finished, we need to use a package manager called pip (no, not him) to find and install the oab script.
Start a command prompt by pressing Start and entering cmd,then in the command window, simply enter:
pip install oab
You’ll see a bunch of semi-scary looking warnings; none are really important other than one which is likely saying:
WARNING: the script <name> is installed in ‘<long directory name>’ which is not on PATH.
It will be easier to run these scripts if you add that folder to PATH. Carefully select all the text of the long directory name between the ‘ ’ marks, and right-clickon it. This will copy that text to the clipboard.
Now enter, in the command prompt:
Set PATH=%PATH%;<right-click to paste the text copied>
eg.
This will mean in future, you can run the “oab” script from anywhere. Test that it works by just entering oab in the command window, and you should get a list of all the available options to run that command.
Step Two – Find your Offline Address Book files
Once you have Python and the script installed, you’ll only need to run steps two and three if you want to subsequently go back and re-extract data from the latest Offline Address Book.
The Offline Address Book (OAB) is built on the Exchange Server or M365 service, usually every day. Outlook (classic) can download on demand, or it tends to pick the latest files up when it feels like it. You probably want to force it, by going into Send/Receive and choosing the option Download Address Book. Keep an eye on the status text in the bottom right of Outlook to see if it’s still downloading stuff, and when it looks like it has finished then proceed.
Now, the trick is to find not only the most recent OAB files, but the ones which correspond to the account you’re interested in; if you have Outlook set up (as in the case above) to connect to several M365 accounts, you may have to try a few times to find the right one – but if you’re in a megacorporation with 500,000 entries and the others are your M365 family subscription etc, then just look for the biggest file. Of all the different files that comprise the OAB, the one we want is udetails.oab.
The OAB files are stored in a deeply buried location which can quickly be found by pressing the Start button or Windows Key, and entering:
You’ll end up with one or more folders with a GUID for a name; open each one in turn and look for a file called udetails.oab in the most recent folder(s).
Copy that file – assuming it has a recent date/time and looks sufficiently large (a 1,000 user company is going to be in the 1MB-2MB size, probably; Microsoft or Amazon will be more like 1GB) – to somewhere that’s easily accessible; why not try c:\users\<yourprofile>. You can get to that location quickly by pressing Start again and entering
%userprofile%
To prevent getting in the way of all the other stuff that’s in your user profile, you might want to create a folder (let’s call it oab) and drop the udetails.oab file in there for later perusal.
Step Three – Extraction
Now we have the latest OAB data file, it’s a simple matter of pointing the script at it.
Start by dropping to a command prompt (press Start and enter cmd) then changing directory to wherever you put the file; if you dropped it into %userprofile% then the command prompt will probably start there. If you put it in a subfolder, or somewhere else, then you’ll need to use cd to change directory (and possibly dir to check it’s there):
Now, from the command prompt, enter the following command to invoke the script to do the work (it is case sensitive so take care):
oab -C -o oab udetails.oab
If your OAB file is 100MBs in size, this might take a few minutes, but if more modest it’ll be a snap:
Now open the oab.users.csv file in Excel, select the whole thing, select Format as Table from the toolbar, tell it that your data has headers, and you should be easily able to filter out the rows you want to keep, delete the rest, then import them back into Outlook as personal contacts. Or do whatever else you have in mind.
As described earlier, to repeat the process in future, just update the OAB, grab the latest udetails.oab file again and re-run the script as per steps 2 and 3. Whatever you do with the resulting files, just make sure you do it responsibly.