 Now that the festive period is behind us, it’s time to get back to the mundanity of the New Year. The salad bar in every restaurant is heaving, every gym has lots of red-faced semi-exuberant new members, and offices are chock full of workers who want to do things better this time around. Now that the festive period is behind us, it’s time to get back to the mundanity of the New Year. The salad bar in every restaurant is heaving, every gym has lots of red-faced semi-exuberant new members, and offices are chock full of workers who want to do things better this time around.
Those of you who ended 2015 with a clear inbox and task list, well done! Those of us who have a new resolution to get more organised in 2016, well, read on.
 The “Getting Things Done” methodology (or GTD to its many devotees) espouses a system for making sure you don’t forget stuff and that you can prioritise what’s important, and like any similar system, it shies away from telling you which tool to use – if a stack of printed cards works for you, then go for it. There is, predictably, much discussion online as to which software tools to use and how to set them up “just so”. YMMV. The “Getting Things Done” methodology (or GTD to its many devotees) espouses a system for making sure you don’t forget stuff and that you can prioritise what’s important, and like any similar system, it shies away from telling you which tool to use – if a stack of printed cards works for you, then go for it. There is, predictably, much discussion online as to which software tools to use and how to set them up “just so”. YMMV.
Out of the box, Outlook isn’t a fabulously GTD-optimised tool. There are numerous addins and guides online to try to get it set up in a suitable way (such as ClearContext, as featured in ToW #233), but true GTD evangelists often give up trying to wrangle Outlook tasks to do what they want: Wunderlist has a new tranche of fanatics. It’ll be interesting to see if and how its task management ideals start to bleed into other tools like Outlook.
Follow me, follow you
If you are a habitual email user and Outlook is your main tool, there are a couple of simple things that everyone could do without needing to get stuck into categories, tasks, projects and the likes.
 Change your startup folder – When you start Outlook, do you really want to jump straight to your inbox, with all of the distractions it contains? What about starting in Tasks or Calendar instead? Easy – just go to File -> Options -> Advanced and you can pick a different place for Outlook to default to. Change your startup folder – When you start Outlook, do you really want to jump straight to your inbox, with all of the distractions it contains? What about starting in Tasks or Calendar instead? Easy – just go to File -> Options -> Advanced and you can pick a different place for Outlook to default to.
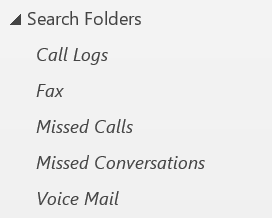 Create a search folder for your flagged mail – if you routinely flag messages for follow up, then it’s a good idea to keep track of them all. The Outlook tasks view can do that for you, but it can be a little confusing, especially if you rely on Wunderlist or some other tasks management app. Create a search folder for your flagged mail – if you routinely flag messages for follow up, then it’s a good idea to keep track of them all. The Outlook tasks view can do that for you, but it can be a little confusing, especially if you rely on Wunderlist or some other tasks management app.
If you expand the Search Folders list in Outlook (in the tree view on the left) you’ll see special folders that are actually a saved query, presenting the results to you from across your mailbox. If you don’t already have a “For Follow Up” folder (or similar), just right-click on the Search Folders heading, 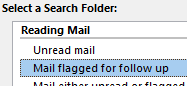 click New Search Folder and choose Mail flagged for follow up. This will create a new search folder fo you, and could even be set as the default folder (as per the first bullet). click New Search Folder and choose Mail flagged for follow up. This will create a new search folder fo you, and could even be set as the default folder (as per the first bullet).
Scheduled start
The problem here is, most of us don’t start Outlook from scratch very often – laptops get put to sleep and woken up again, and it could be days or weeks between reboots, so most of the time, you already have lots of Outlook windows open.
To work around this, we can fall back on a technology that’s been part of Windows since NT 3.1, all of 22 years ago – the AT command. This allows the console operator (ie you) to schedule some background task within the bowels of the OS, and to specify how it runs as well as when – will it be silent, will it be able to interact with the current logged in user?
The intrepid among you could delve into AT (just start a command prompt by pressing WindowsKey+X and choose the Command Prompt (Admin) from there) but most of us would prefer to use the Task Scheduler UI that was built to make the process easier. Reading the instructions below, this might sound like a faff, but if you follow them step-by-step, it’ll take 2 minutes.
What we’re going to do is to set a time when a new Outlook window will be fired up, at a specific folder. So, you could say at 7:00am or the next available time after (ie when your machine wakes from sleep), then create a new Outlook window pointing to the Follow Up search folder we just created above.
Start by running the Task Scheduler  (press start, type task s…). Don’t be put off if you see lots of tasks you don’t recognise. (press start, type task s…). Don’t be put off if you see lots of tasks you don’t recognise. 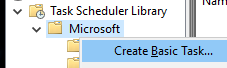 Expand the Task Scheduler Library and right-click on Microsoft then Create Basic Task. Expand the Task Scheduler Library and right-click on Microsoft then Create Basic Task.
This will walk you through a wizard to set up the task.
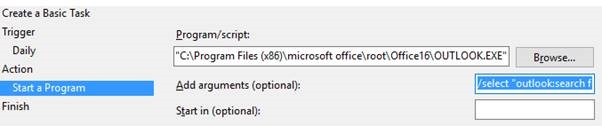
- Call it something like Daily Outlook (next), choose a frequency – daily (next) then a time (7am?) (next), You want to start a program (next)
- Now you need to find the path to the Outlook executable – it’s likely to be
“C:\Program Files (x86)\microsoft office\root\Office16\OUTLOOK.EXE” or similar – try copying that text and enter it into the Run command (WindowsKey+R) – if it launches Outlook, you’re in business. If it doesn’t, then you might need to search your computer for OUTLOOK.EXE, and copy that path to the appropriate file.
- Enter the appropriate path, wrapped in quotes (“”), into the task wizard Program/script box and in the Add arguments box, enter /select “outlook:search folders\For Follow Up”, or whatever folder you want to open (just put the path and folder name in the bit after outlook: in the argument above).
- To test that argument, try just running (via WindowsKey+R)
outlook /select “outlook:search folders\Sent Items” (or whatever your path is)
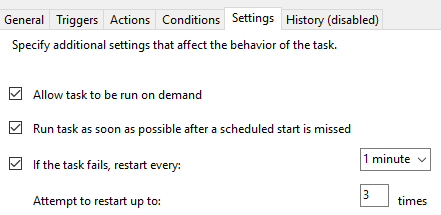 When you get to the end of the task wizard, tell it that you want to open the properties dialog for the task when you click finish. Navigate to the Settings tab, and check the box that you’d like to Run task as soon as possible after a scheduled start is missed – this way, if your laptop was still asleep at 7am, it would run Outlook up next time you log in. You might as well check the “restart every…” one too. When you get to the end of the task wizard, tell it that you want to open the properties dialog for the task when you click finish. Navigate to the Settings tab, and check the box that you’d like to Run task as soon as possible after a scheduled start is missed – this way, if your laptop was still asleep at 7am, it would run Outlook up next time you log in. You might as well check the “restart every…” one too.
Now you can OK out of the properties and return to the task list view – right-click on your newly-created task, and try “Run”- you may not see the Outlook window come to the fore, but if you look on your task bar, at the collection of Outlook windows you may otherwise have, then it should be there. If you see the “Last run result” in the task view showing something other than (0x0), then something went wrong – you may want to open the task up again, and check that you’ve got the right path to Outlook and the right path to your chosen folder. |