 Productivity gurus wax on about how gaining and maintaining control of your never-ending to-do list starts with the way you prioritise, and how you build discipline in working through your task list rather than being distracted by less important “stuff”.
So, why is it that we stick with the default setting in Outlook, which starts up showing the Inbox folder, and with the most recent mail at the top…?
The only thing more distracting than looking at an inbox full of shiny new mail, is to have the new mail notification flash up in front of whatever else you’re doing, to tell you about it.
Check out the very first Tip o’ the Week – how to switch off the Outlook new mail notification. Try it out.
Live notification-free for at least a day; you can always switch it back on again if you need to.
If you’re on a Lync meeting and someone shares their desktop to show you a presentation (tsk, tsk), or you’re watching a presentation/demo on a big screen, feel free to berate the presenter publicly if they receive a new mail notification during the meeting.
Here’s a tip that Microsoft’s own internal IT training programme recommends: set which folder Outlook starts up in. When you launch Outlook for the first time, don’t have it go into your Inbox – what about opening your Calendar instead?
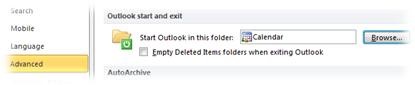 To change, go into the File menu, under Options then Advanced. Scroll down to the Outlook start and exit section, and pick your folder of choice. Simple as that – though if you routinely sleep and resume your PC, you might not be starting Outlook very often, so you may only see this occasionally.
Create Follow Up Search Folder
Another idea is to set up a Search Folder to be the launch pad for super-productivity. Search Folders look like regular folders, but actually show you contents that meet specified criteria, from across your mailbox – eg a “For 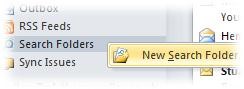 Follow Up” folder will show you all mails that have been flagged, regardless of location. This makes a great startup folder, since it will only display mail with outstanding actions, rather than all the other guff that may have come in recently.
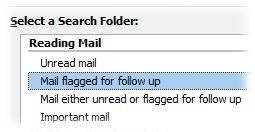 To create a Follow Up search folder, scroll down to Search Folders in the left-hand folder view pane, and right-click on the Search Folders node then click New. In the dialog that pops up, just pick Mail flagged for follow up and it will create a search folder called For Follow Up. The first time you access the folder, it may take a few moments to display everything but afterwards it should be pretty quick.